We Got a STEEL of a Deal!

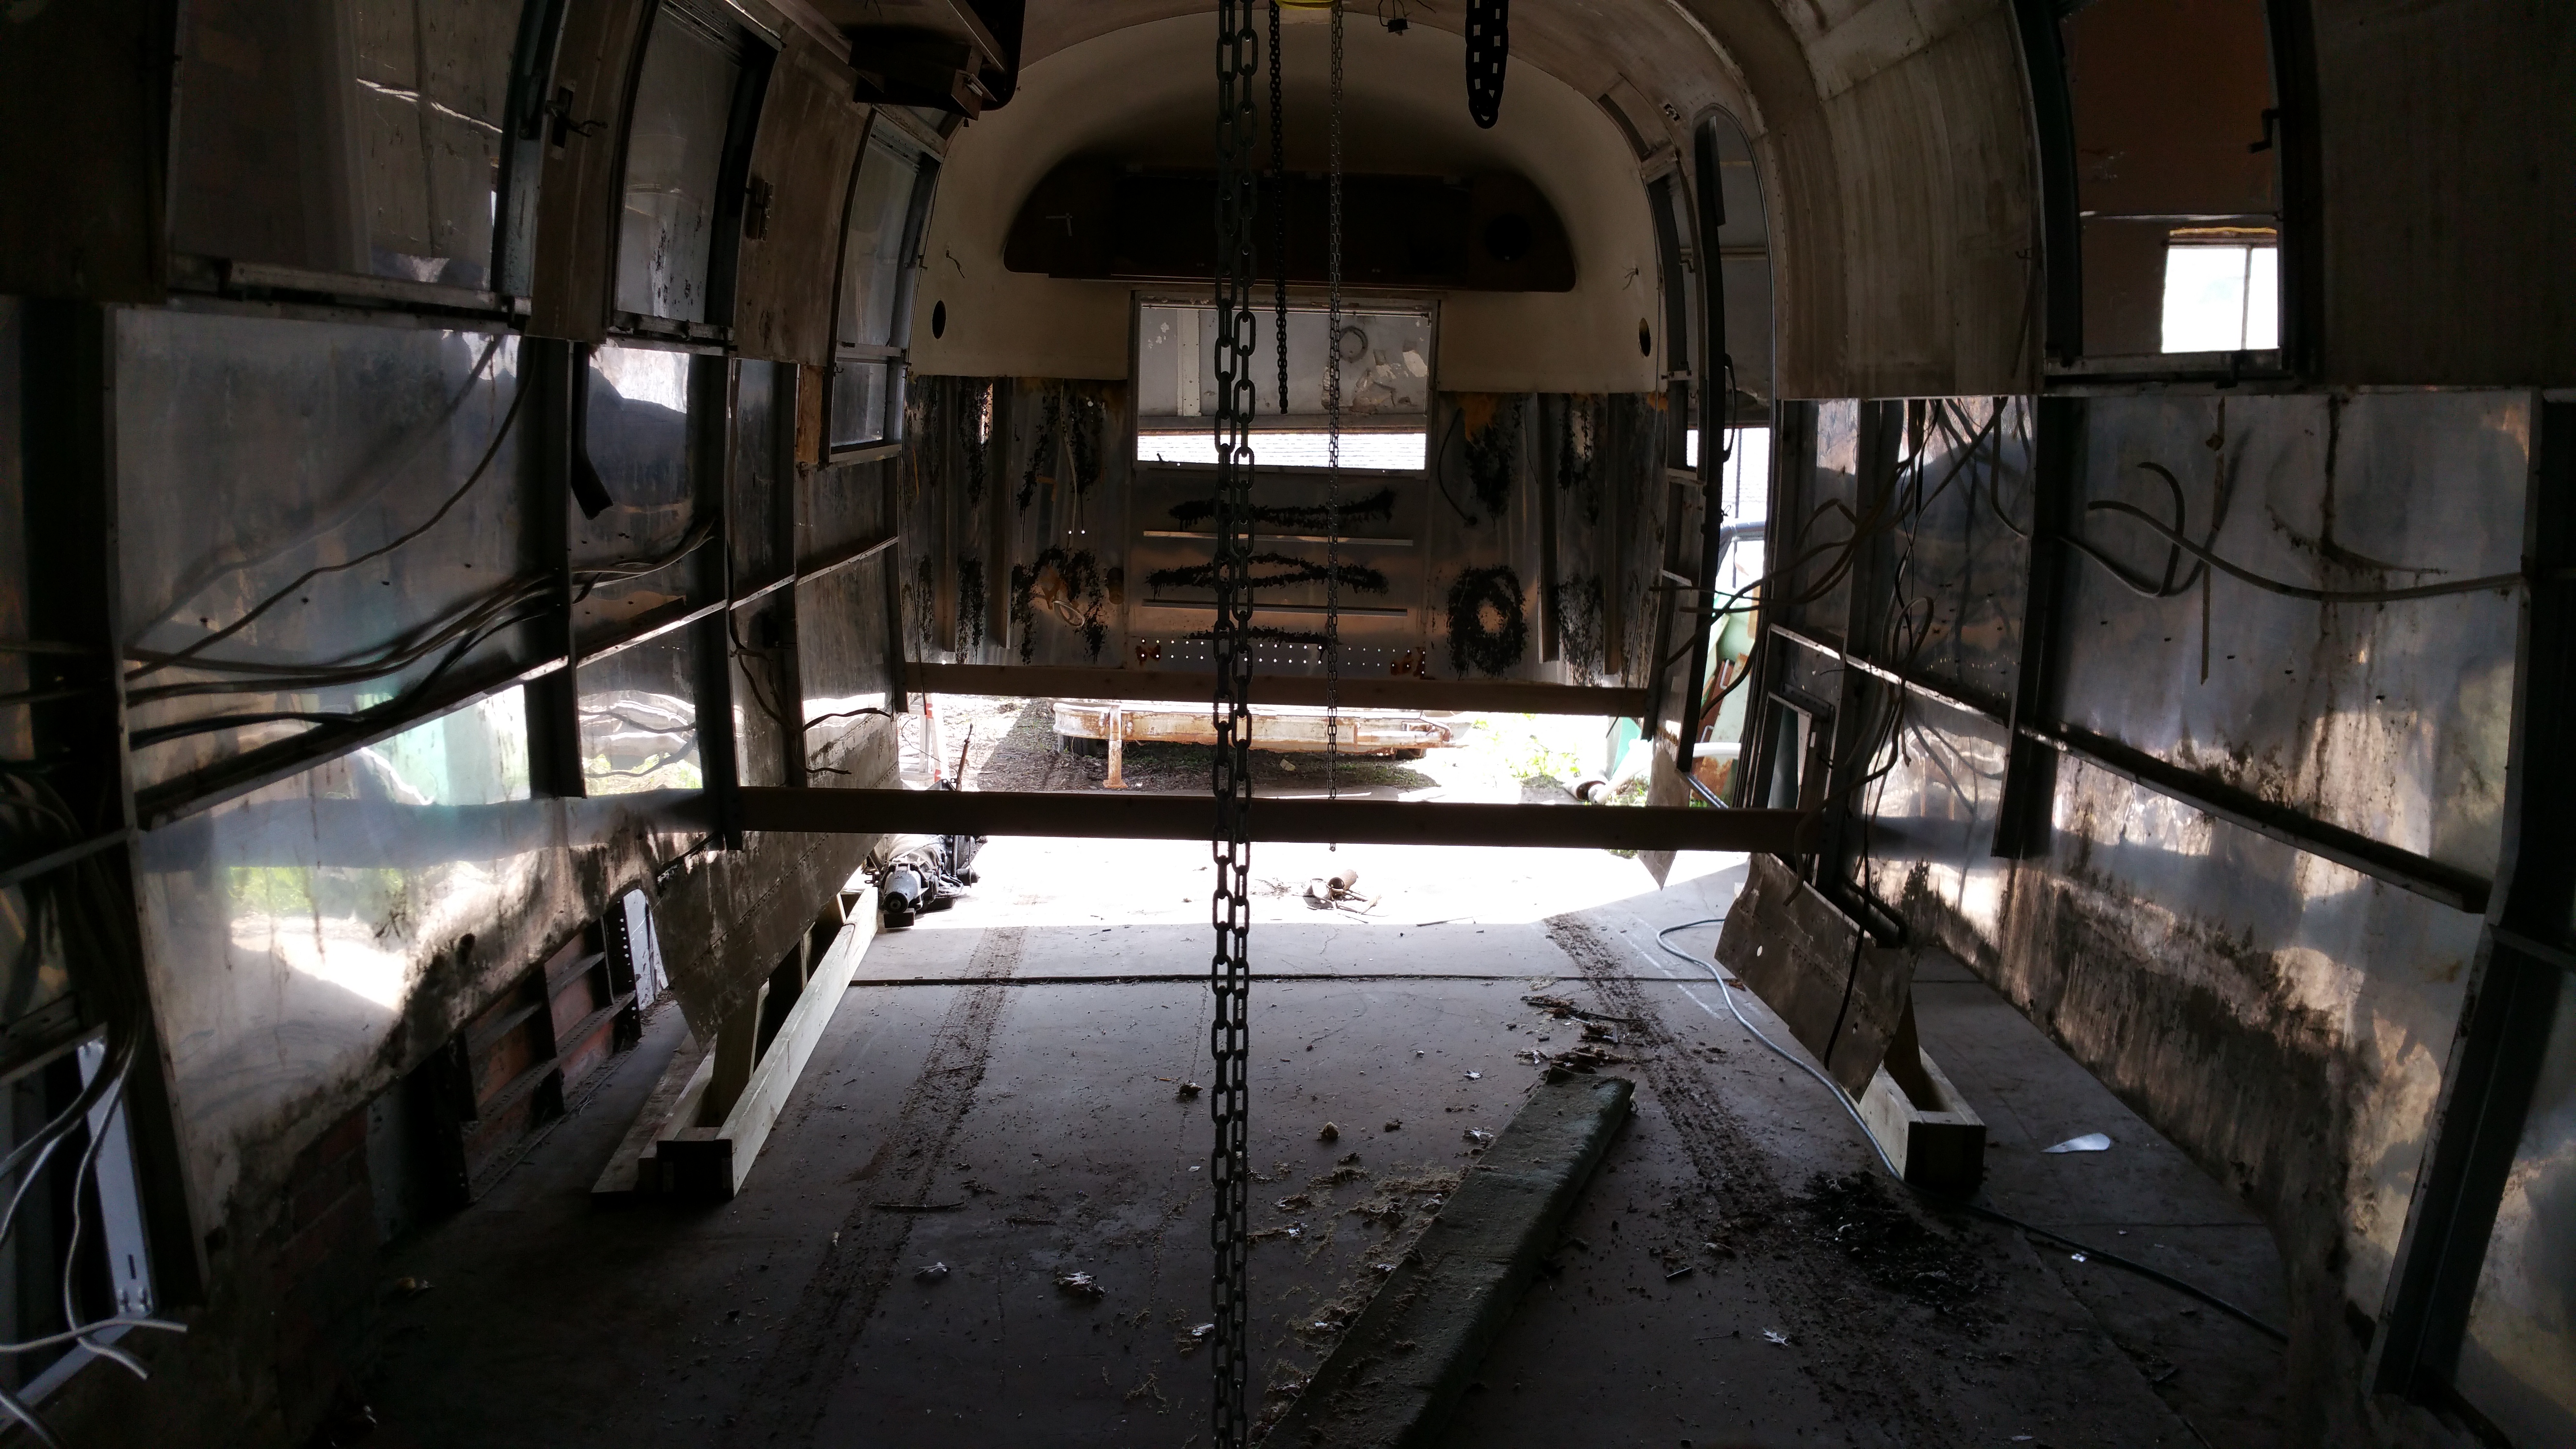
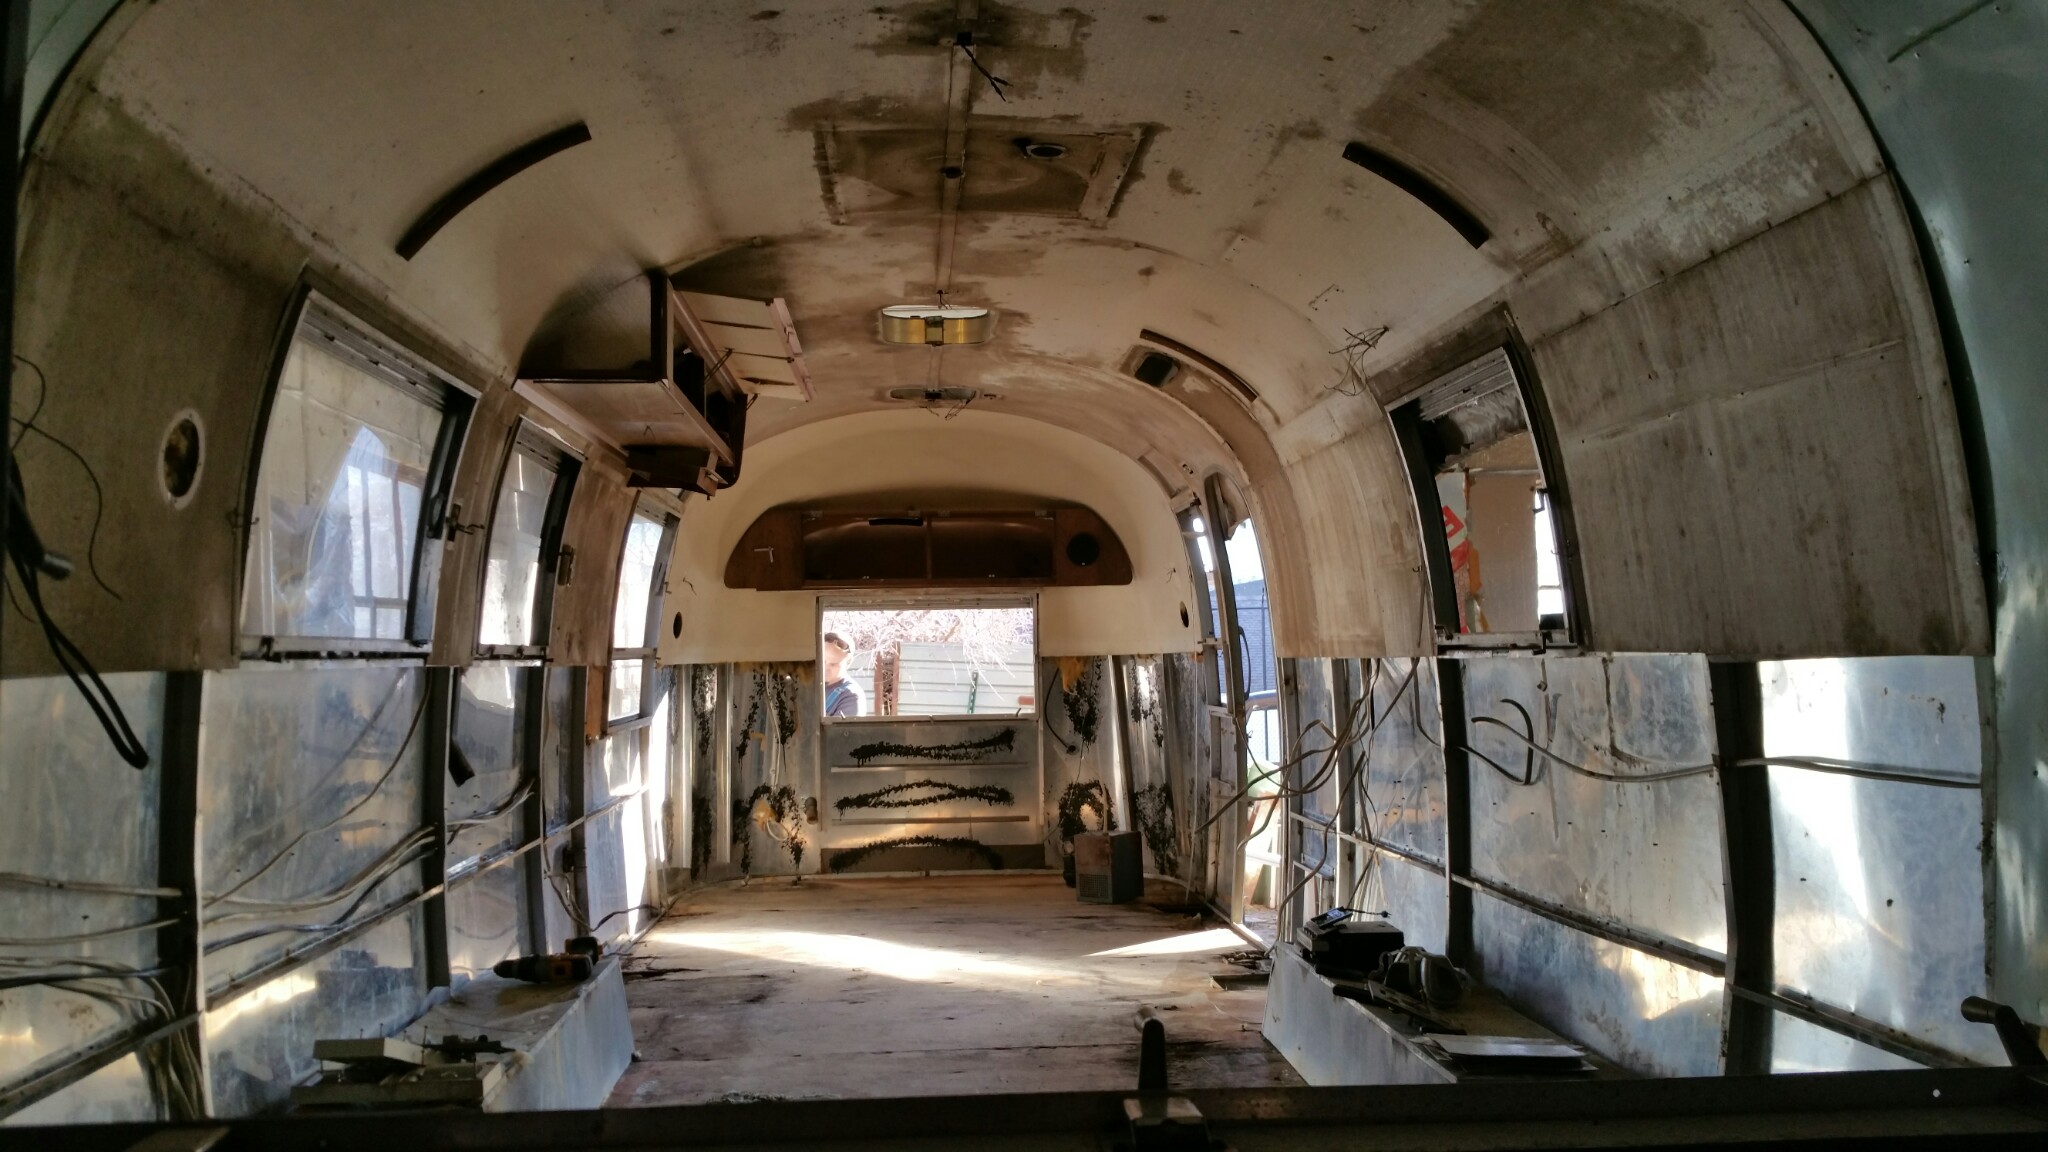
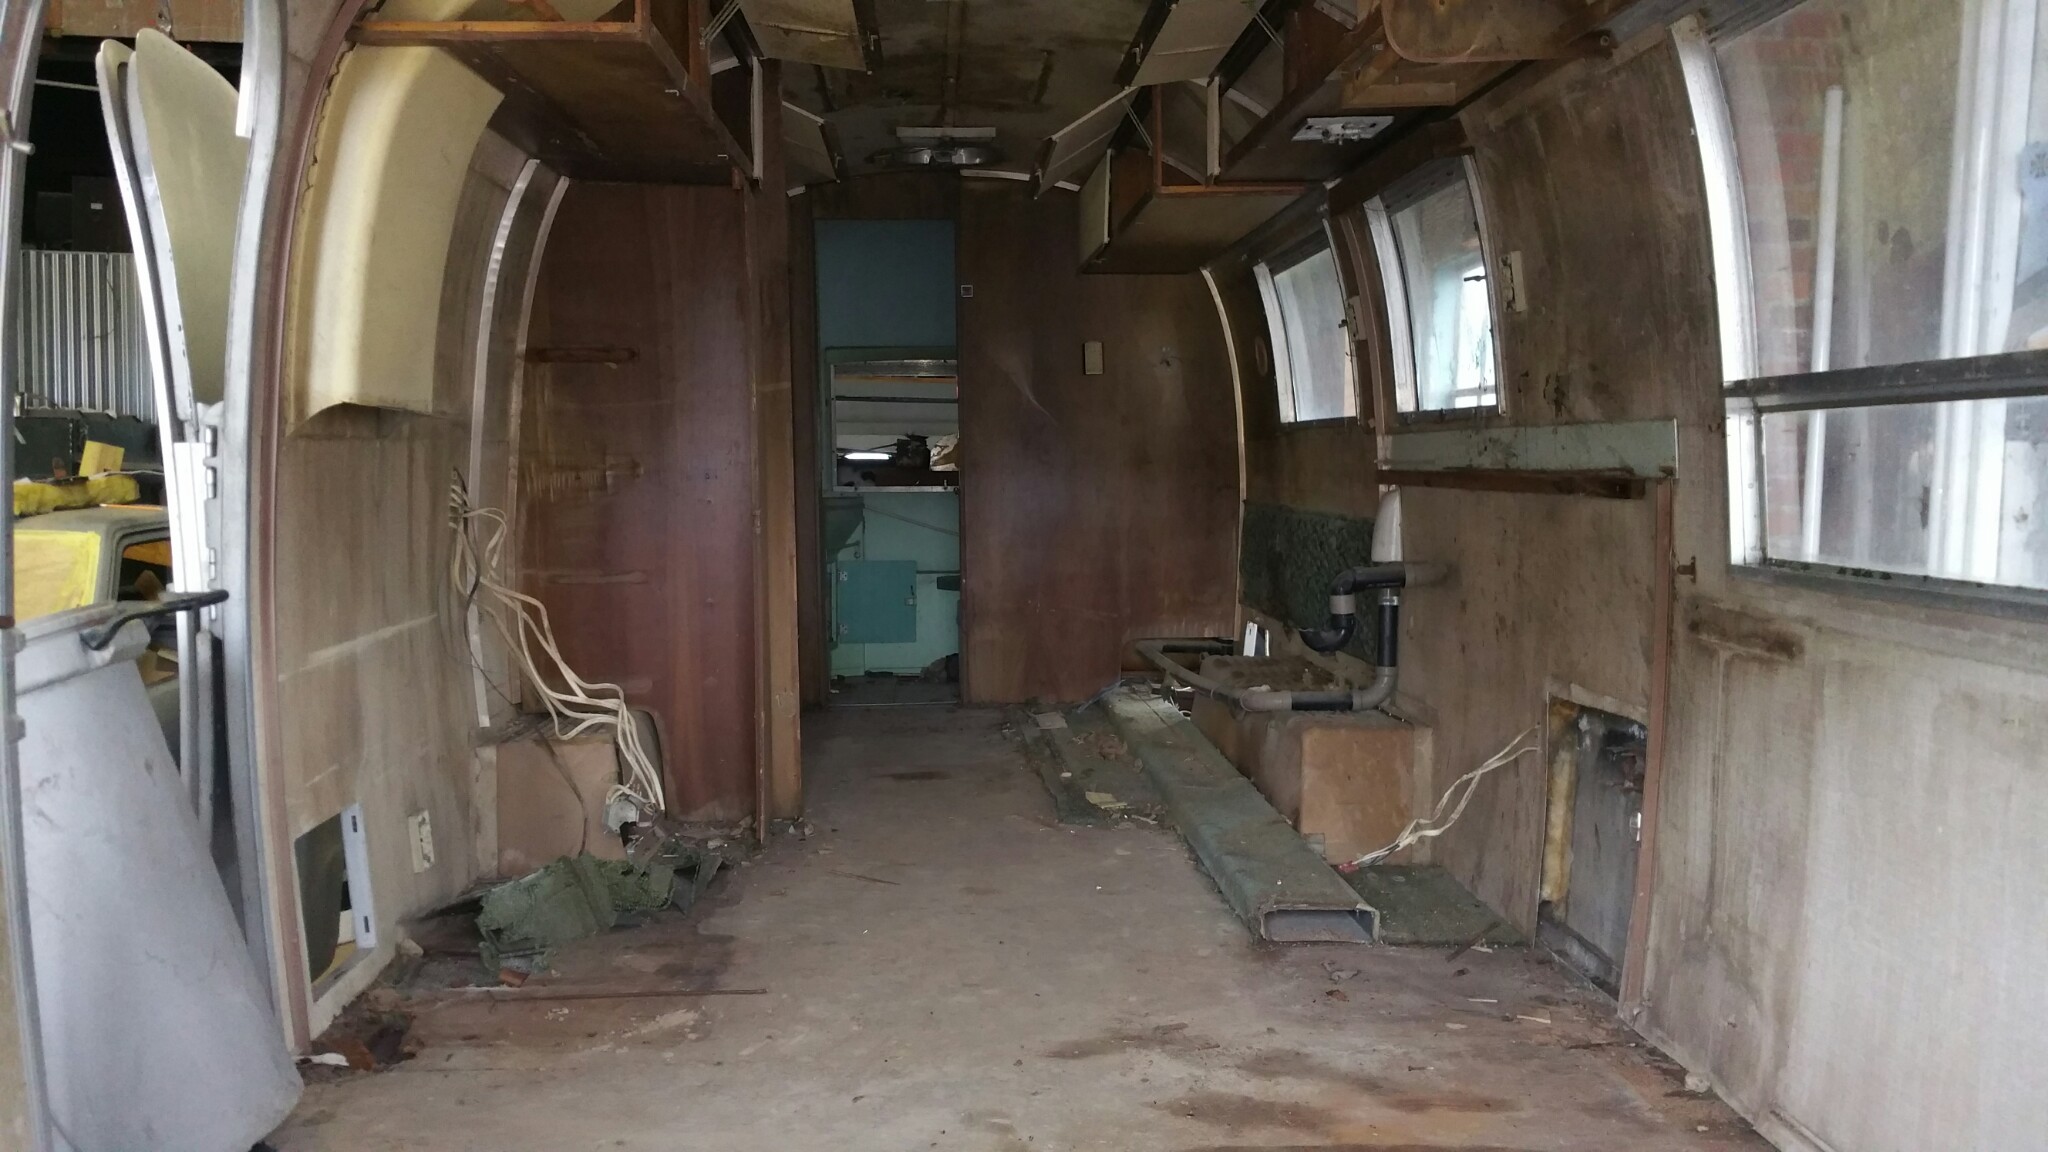
Also appropriate title: We STEEL Got It! The Airstream, I mean.

20150514_170825

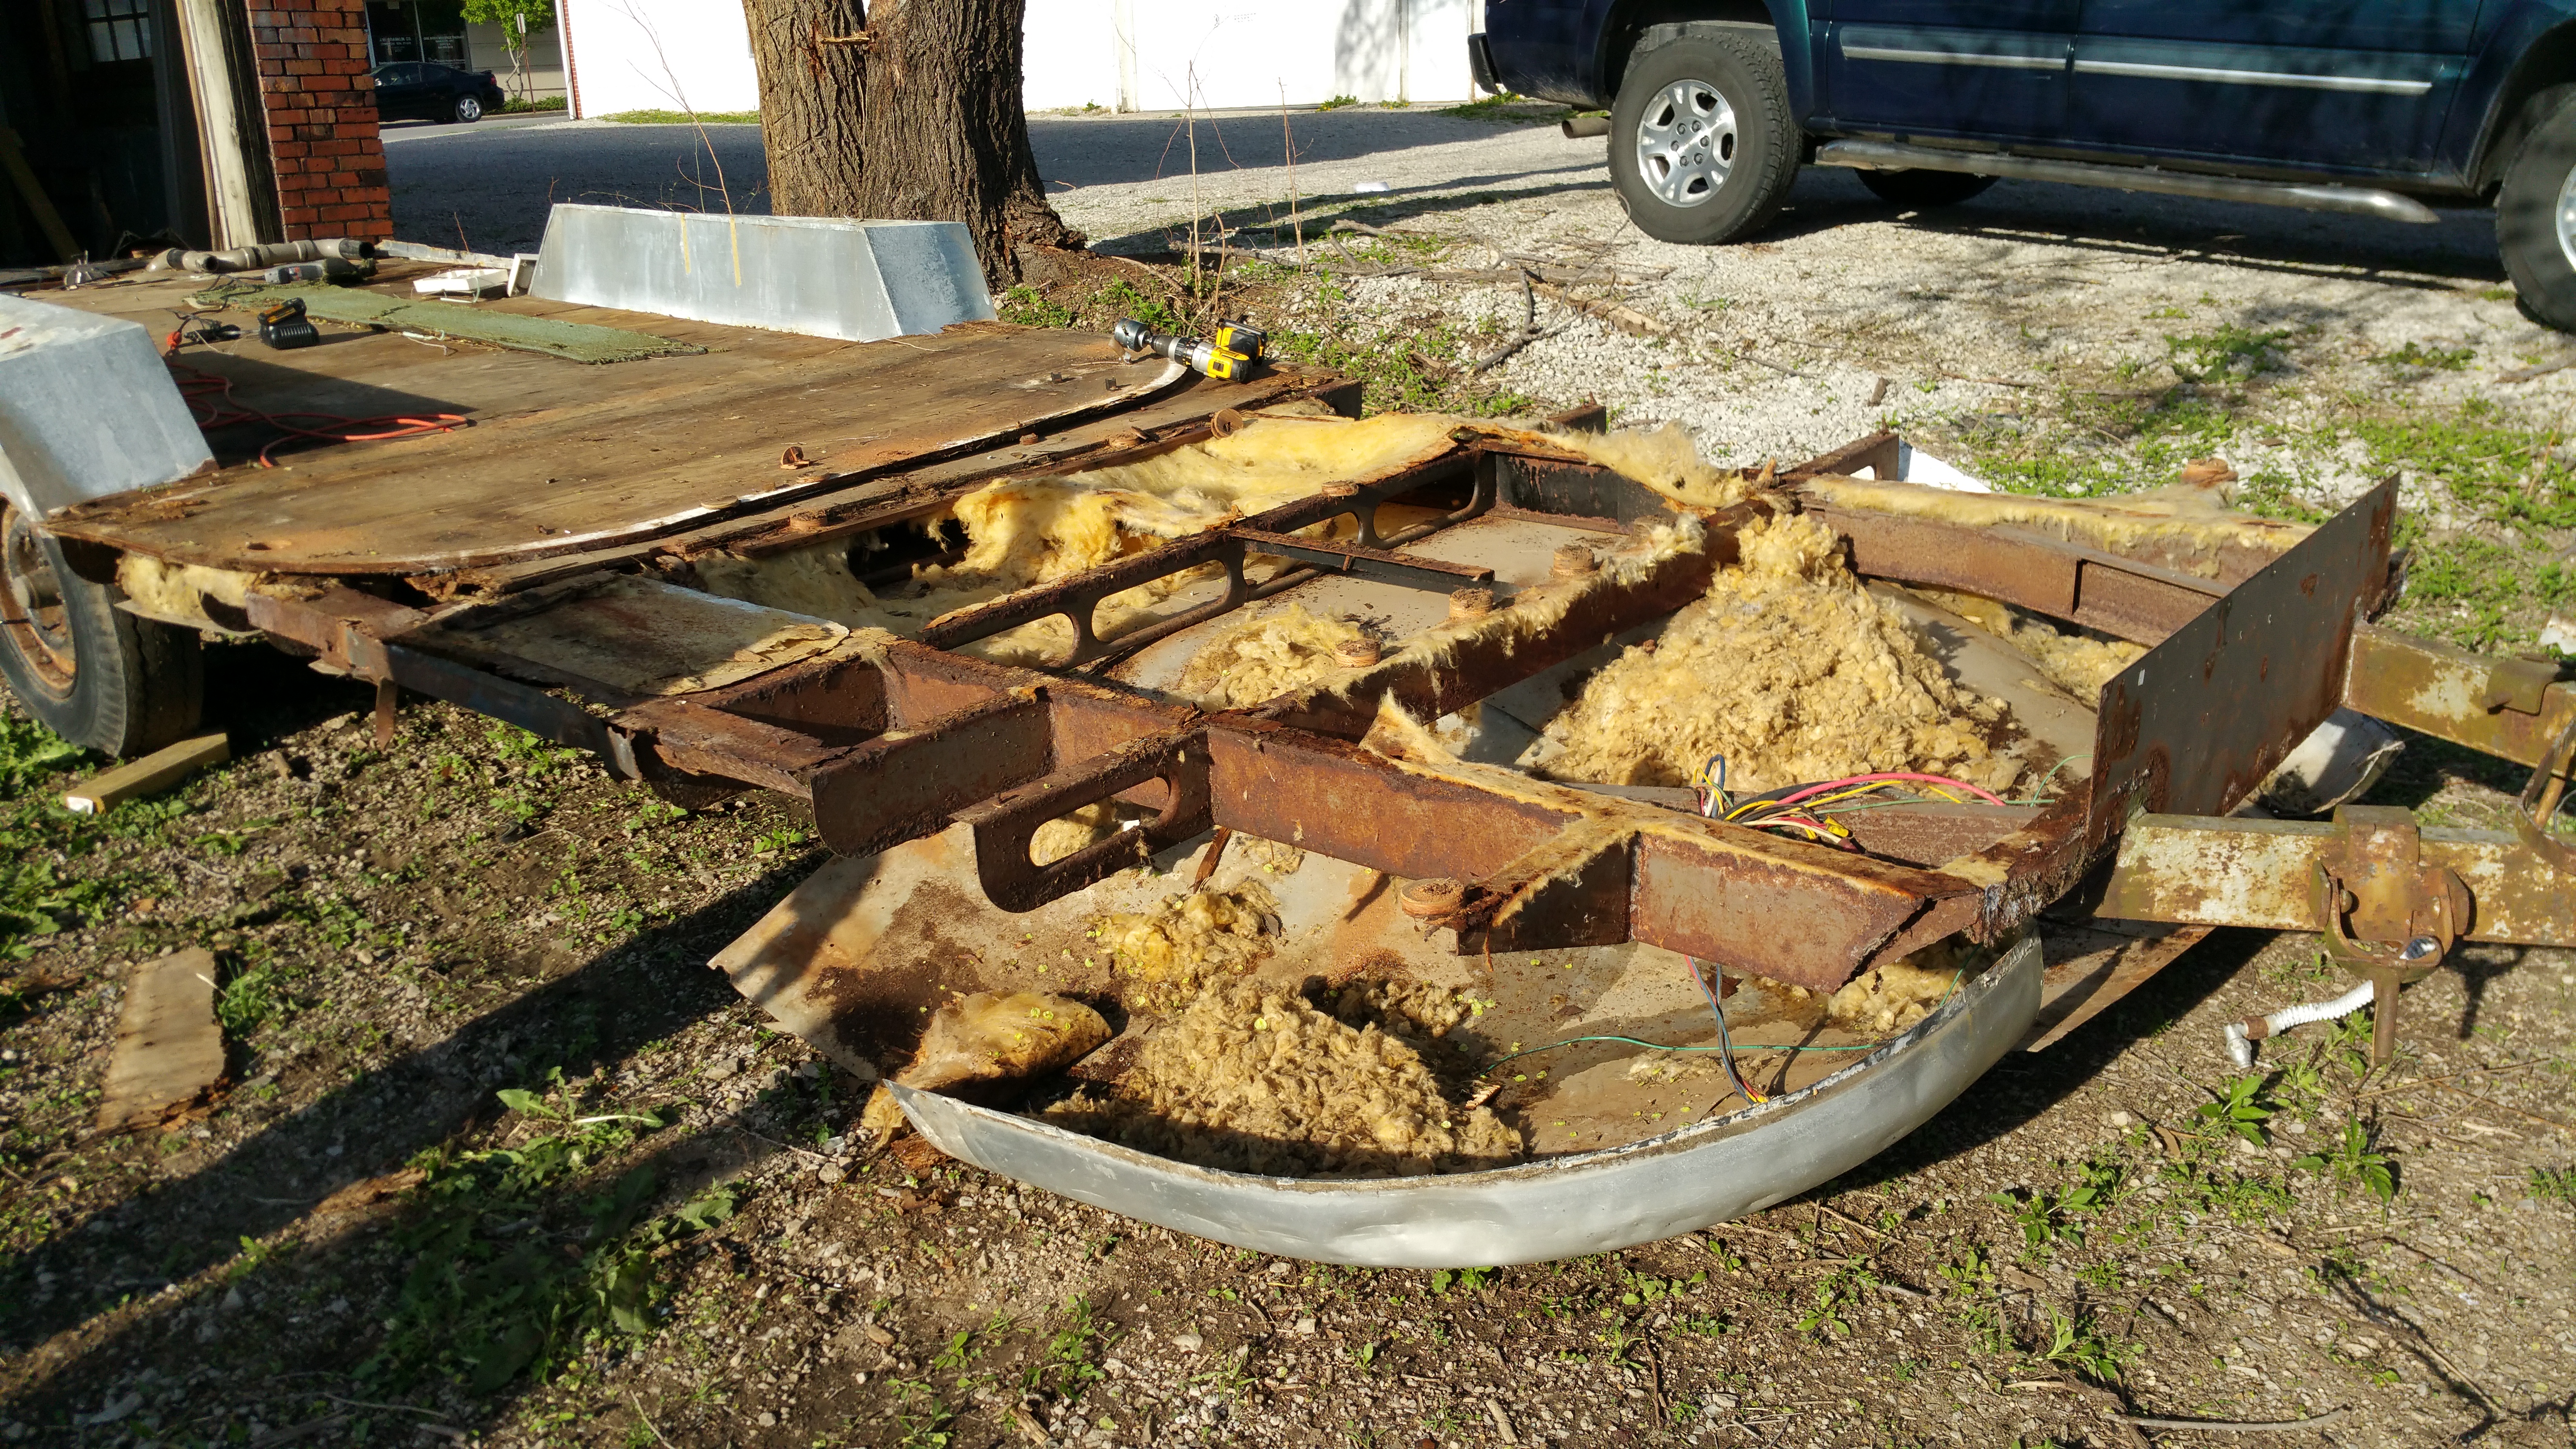
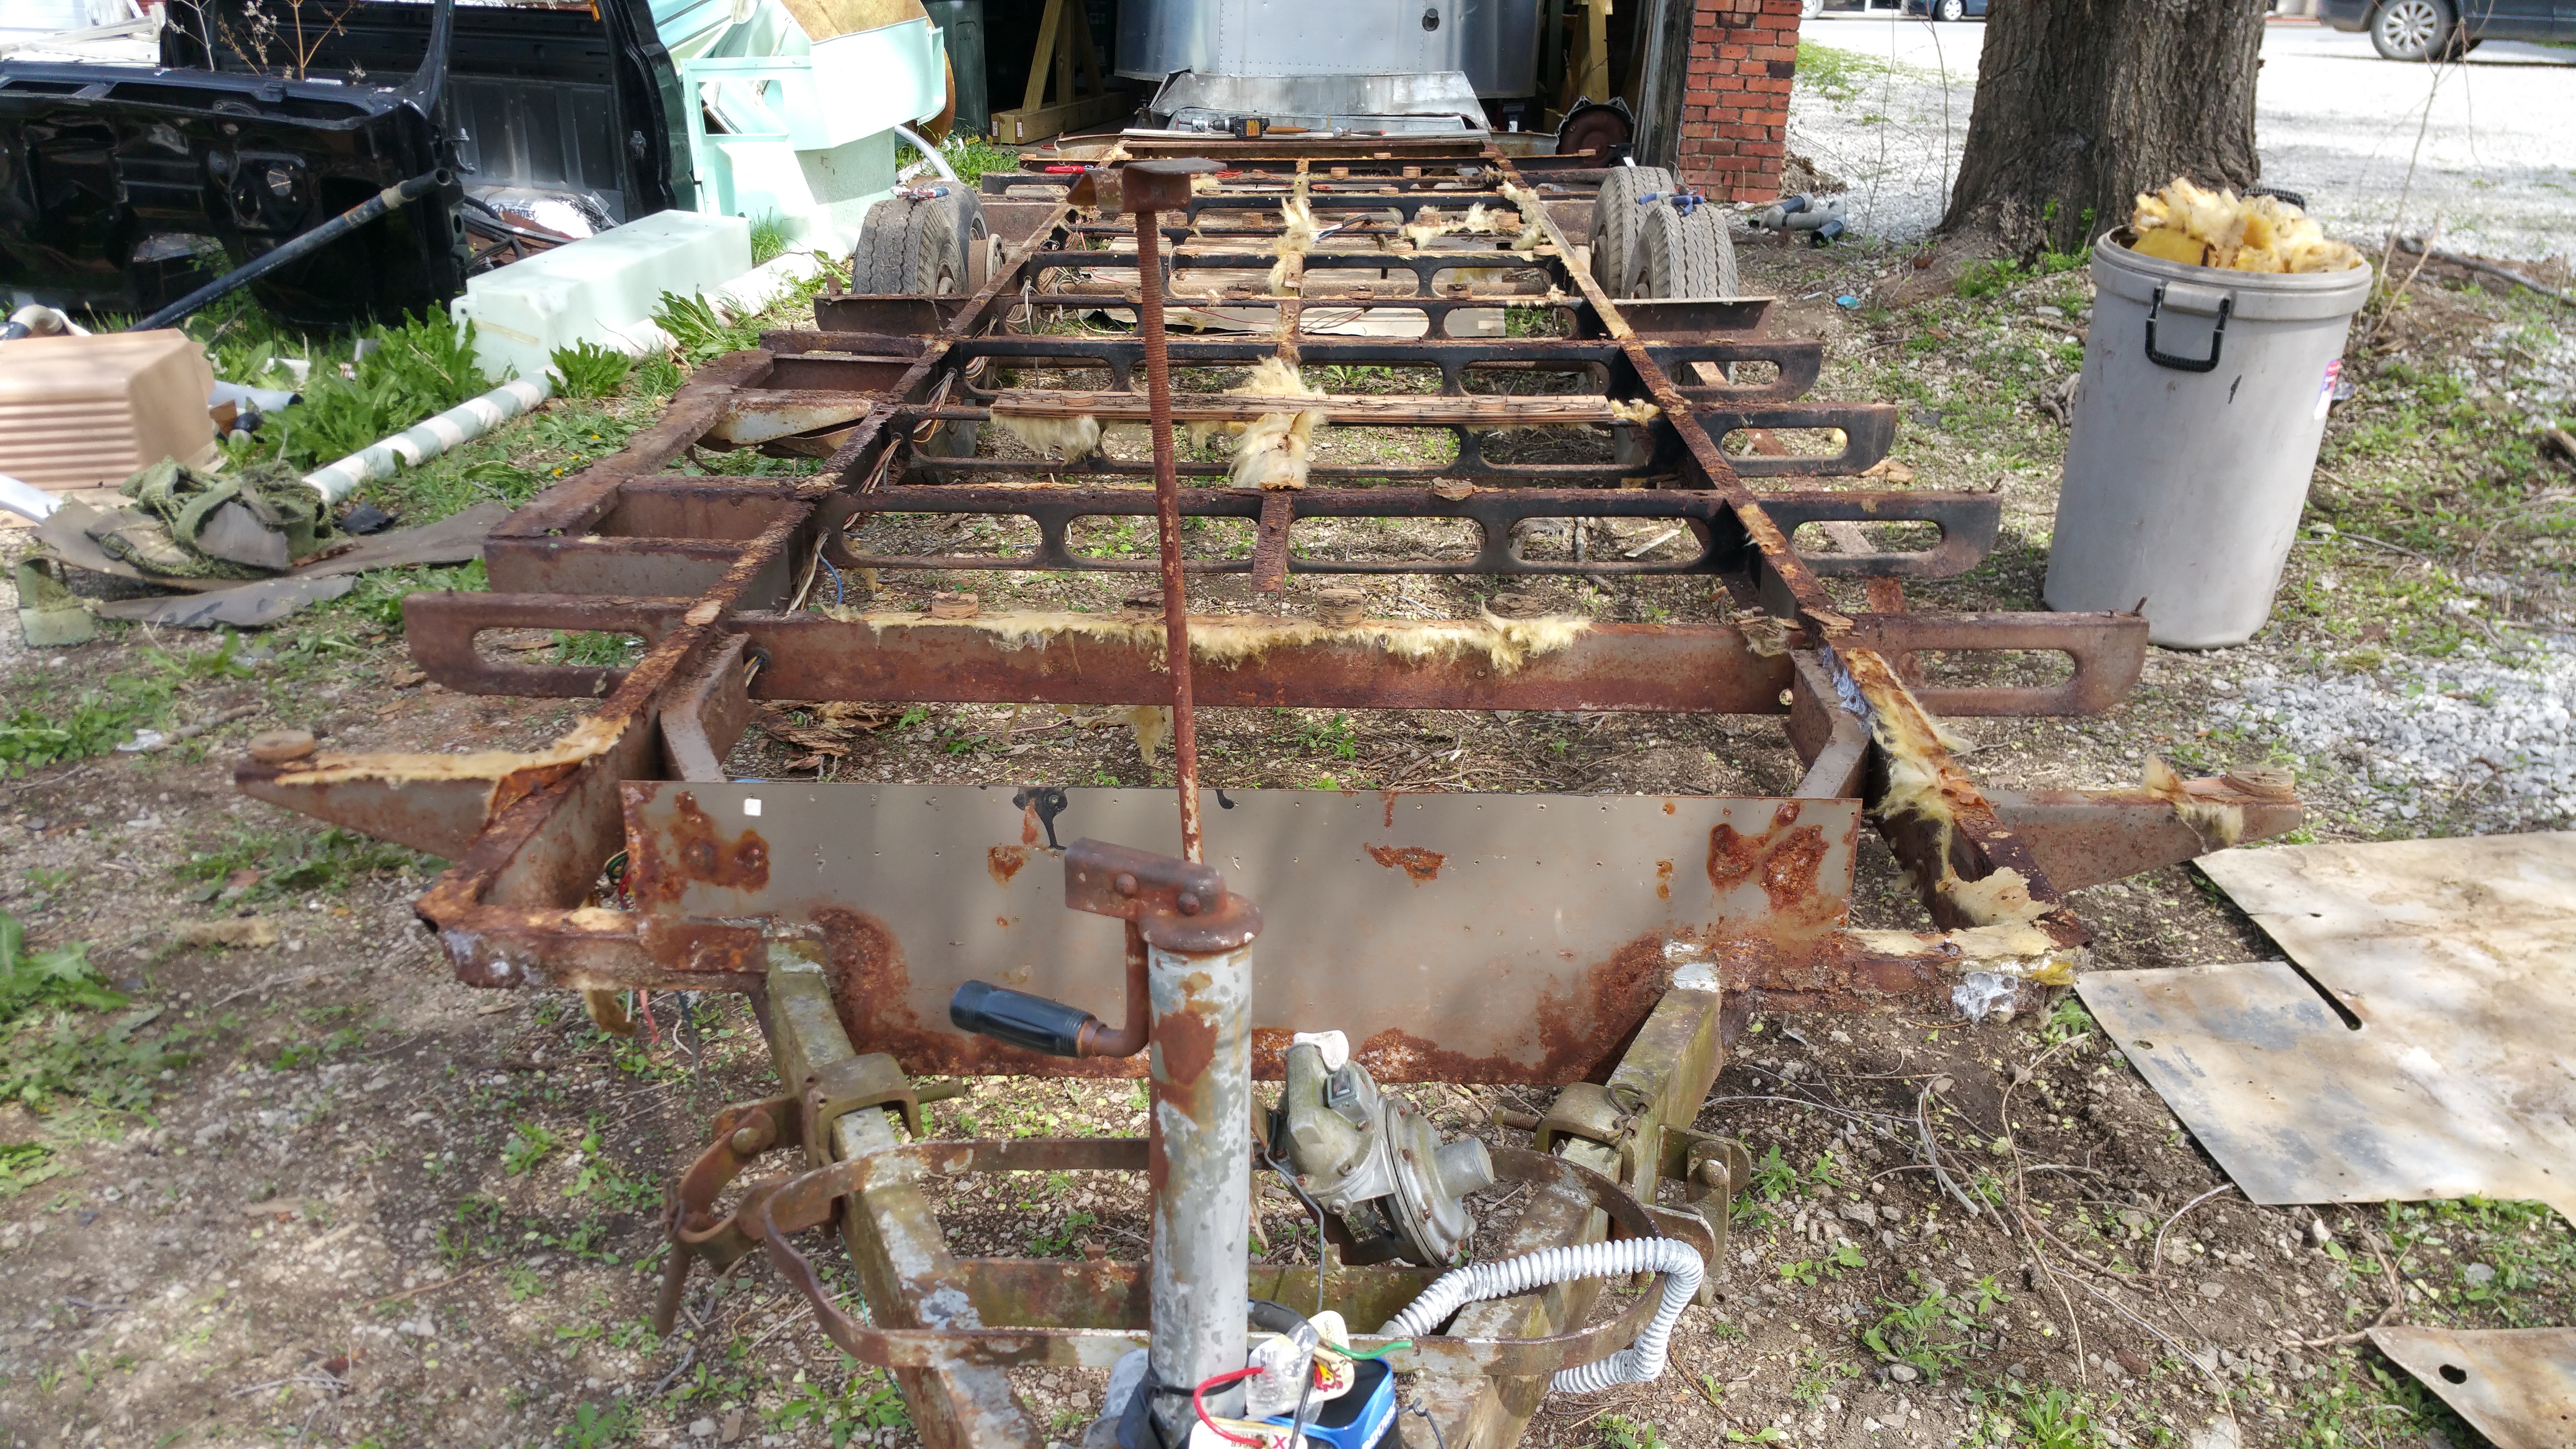
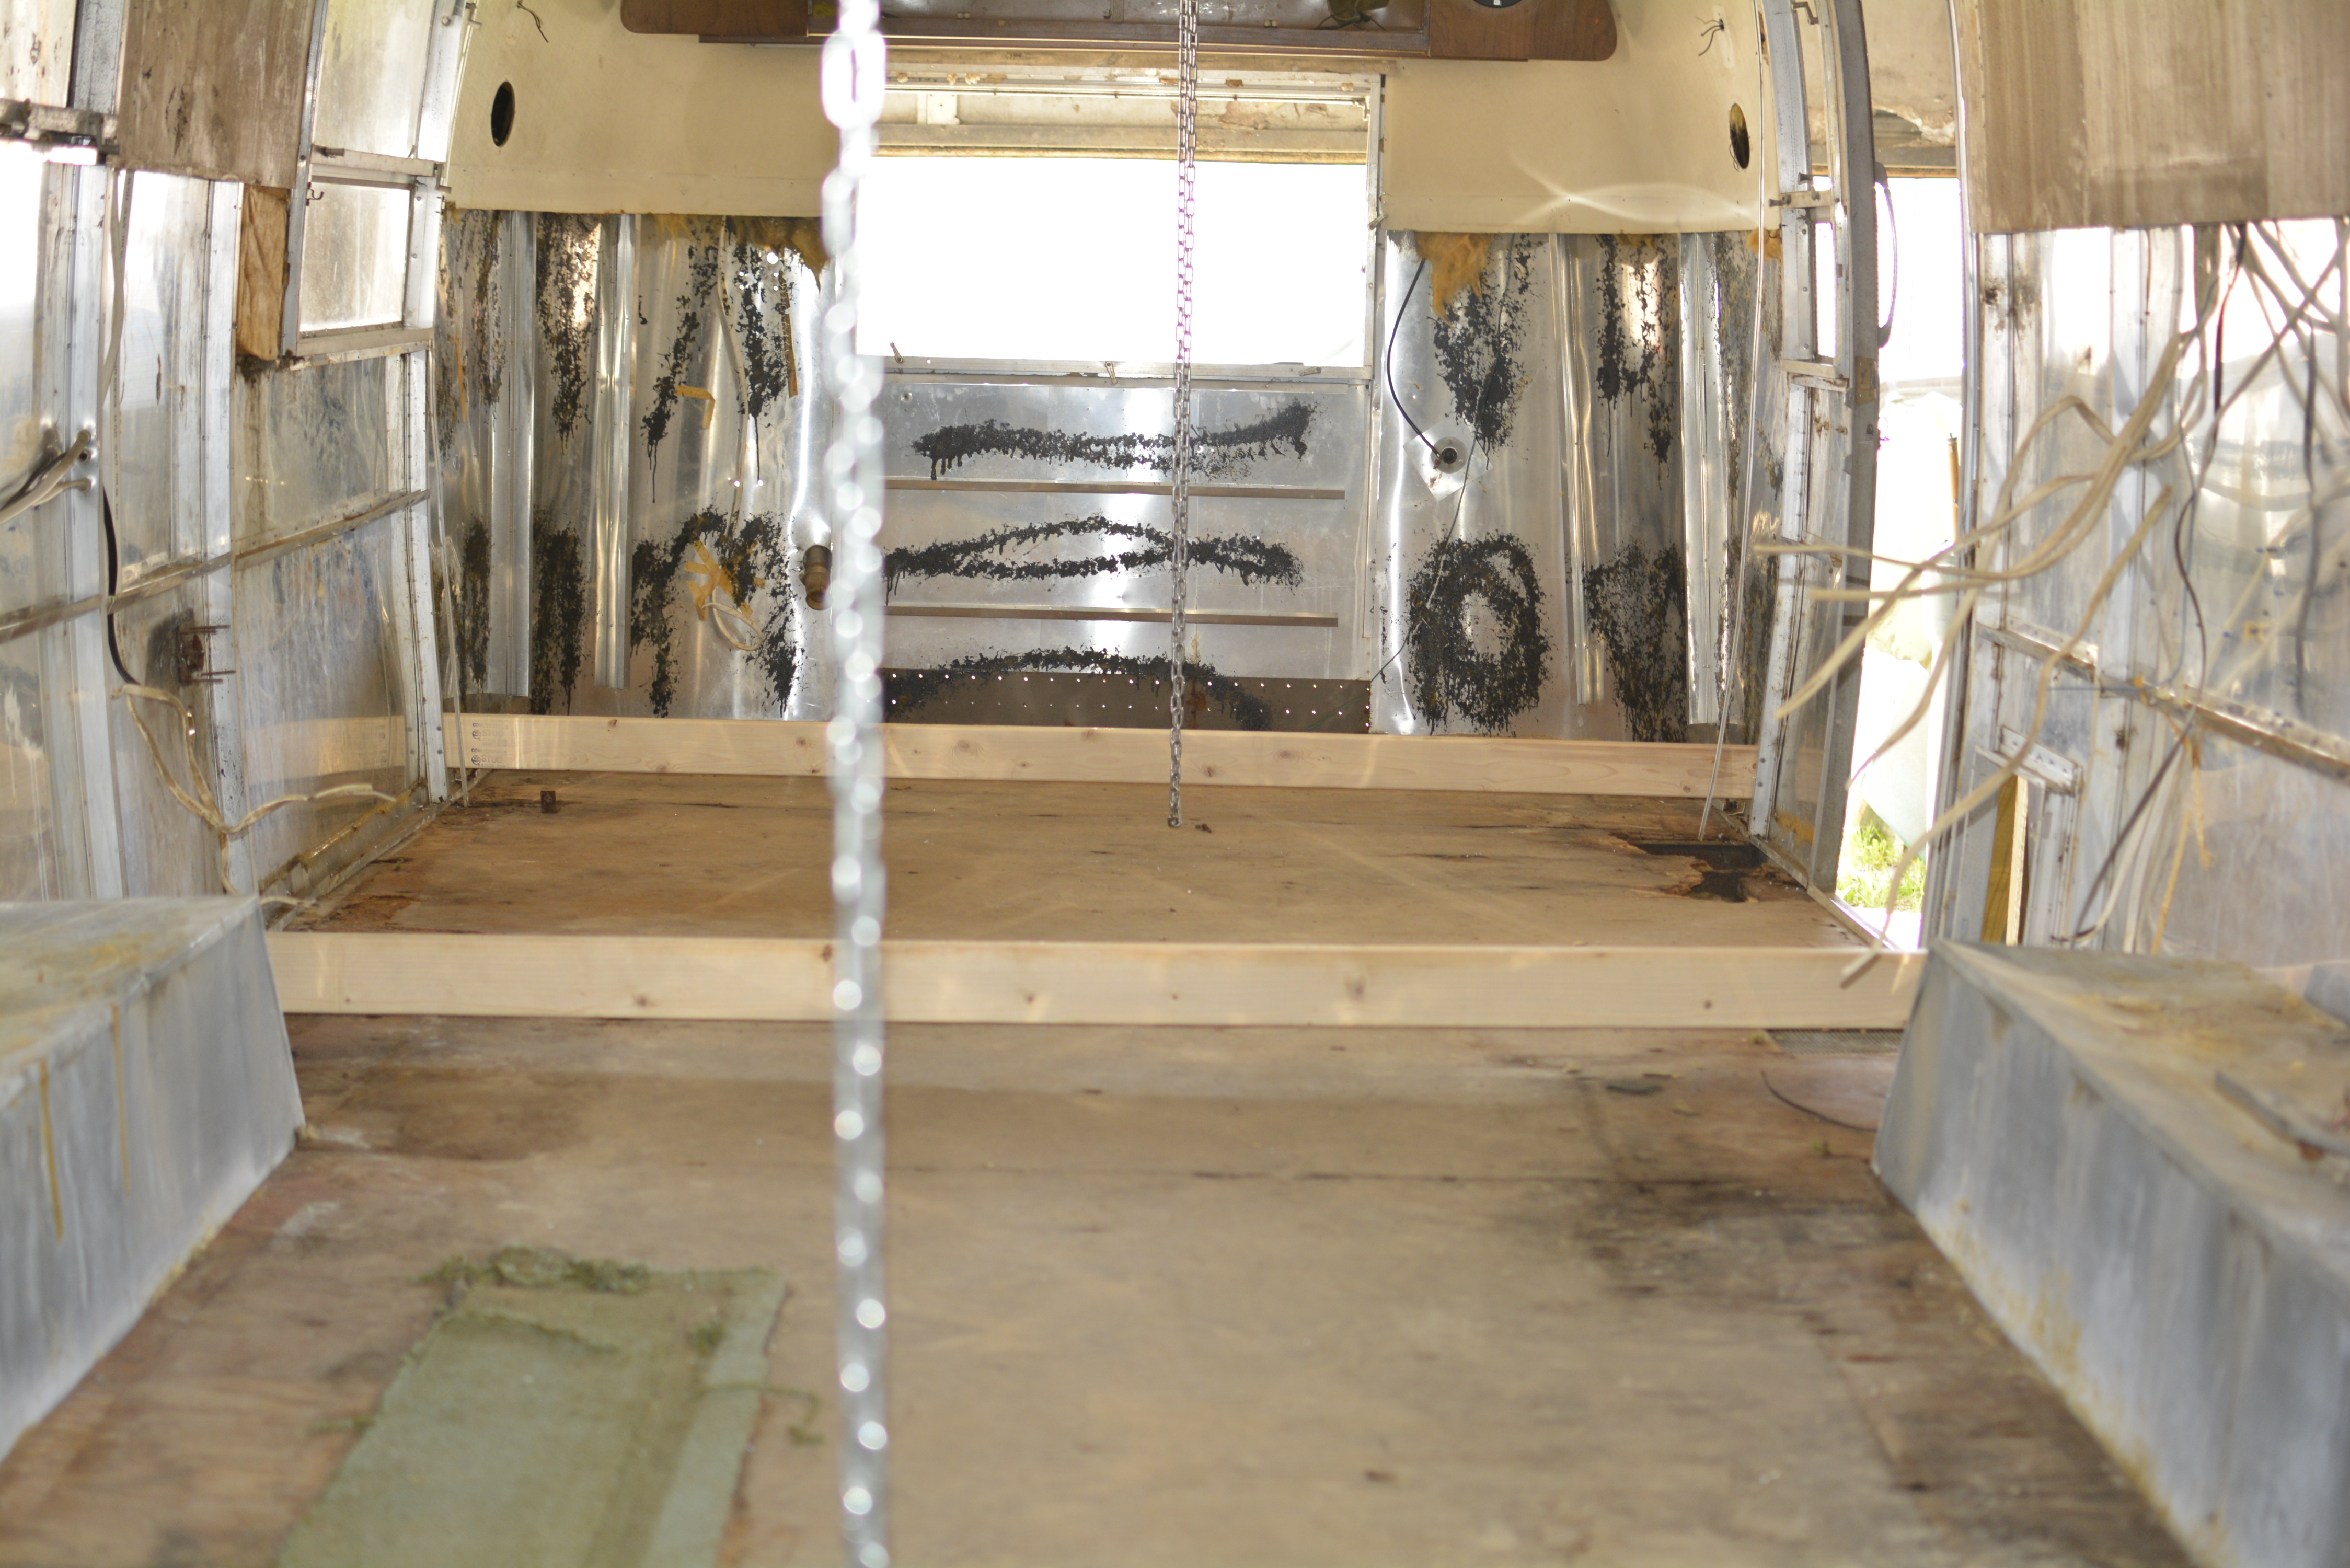
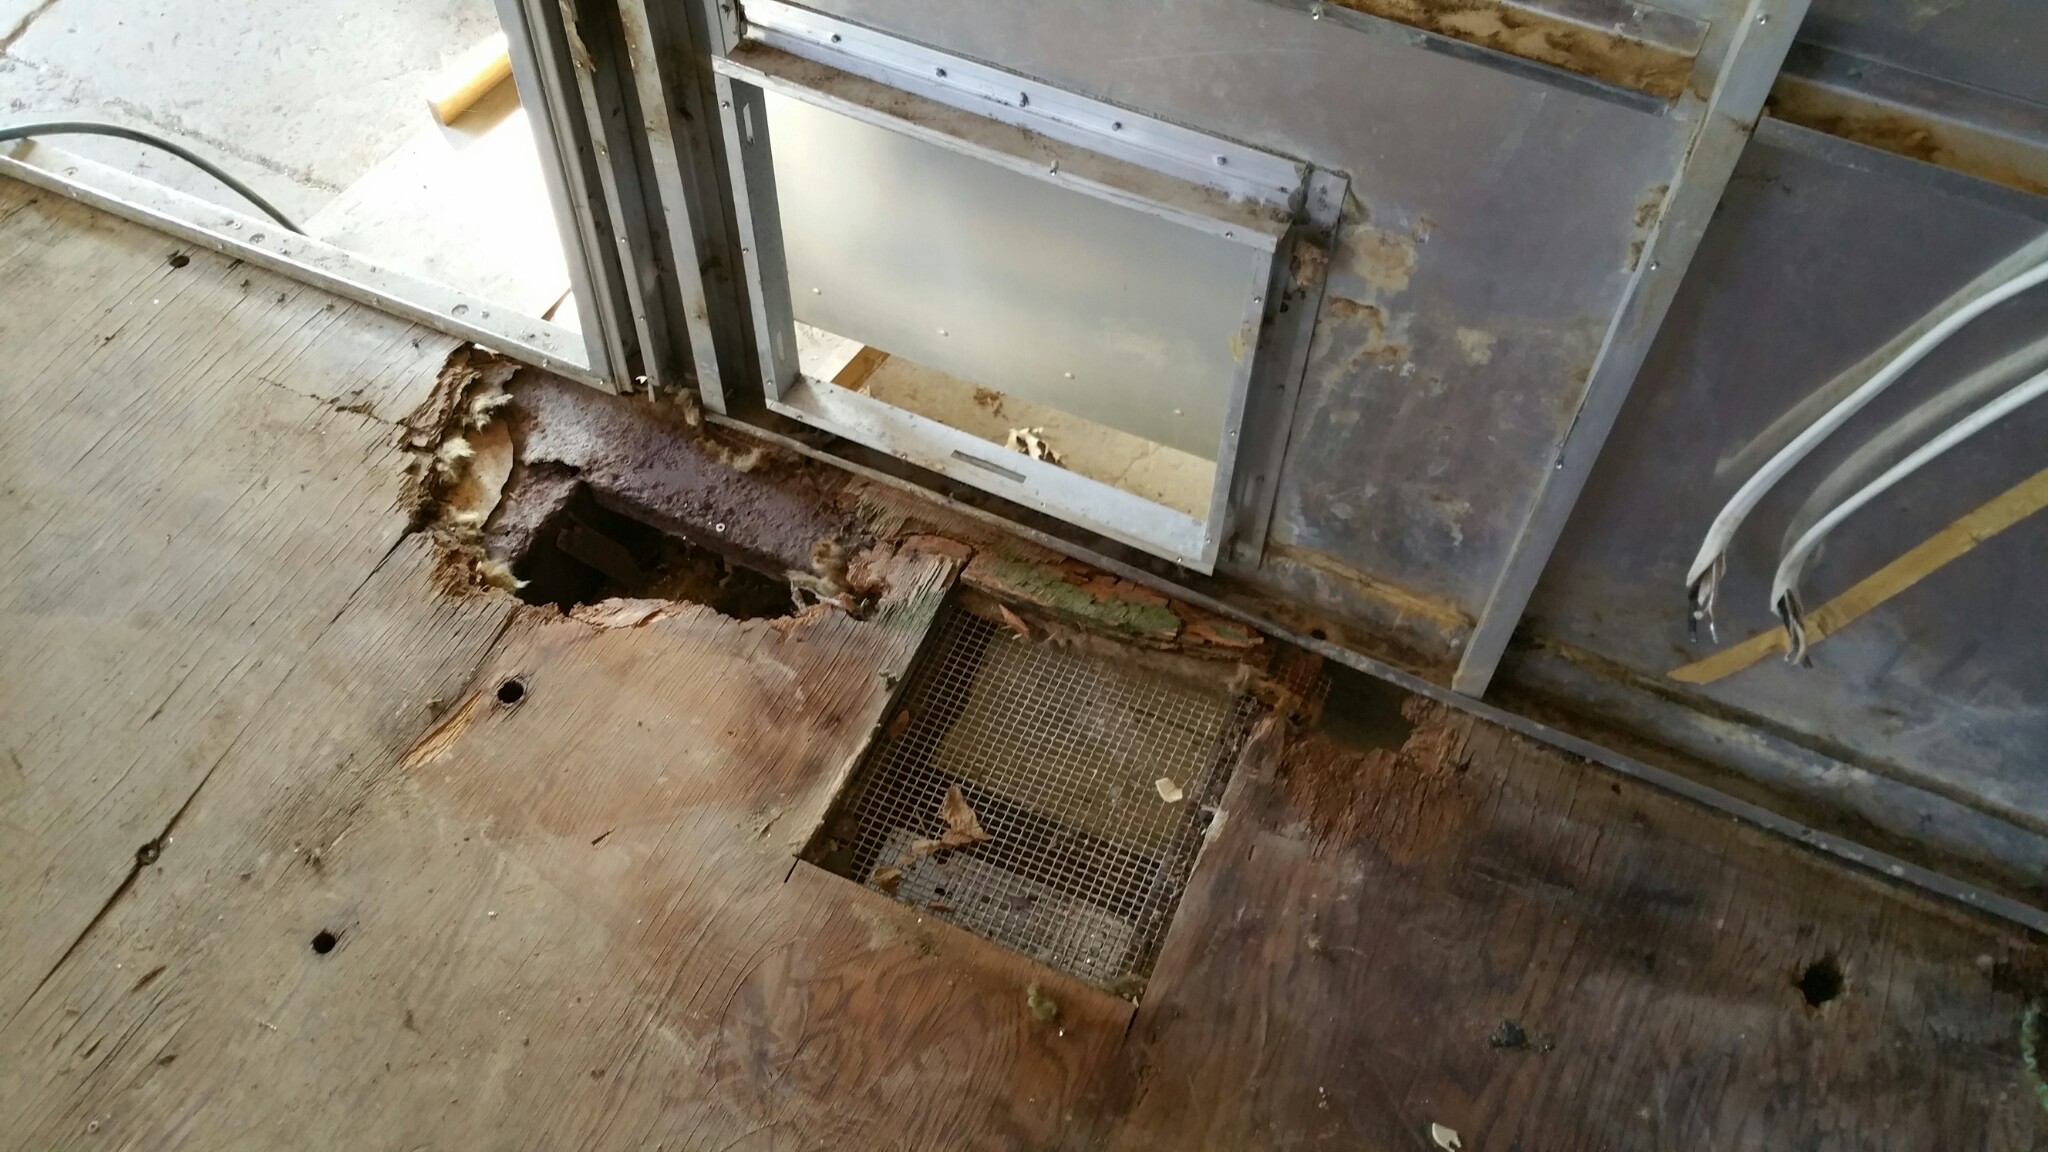
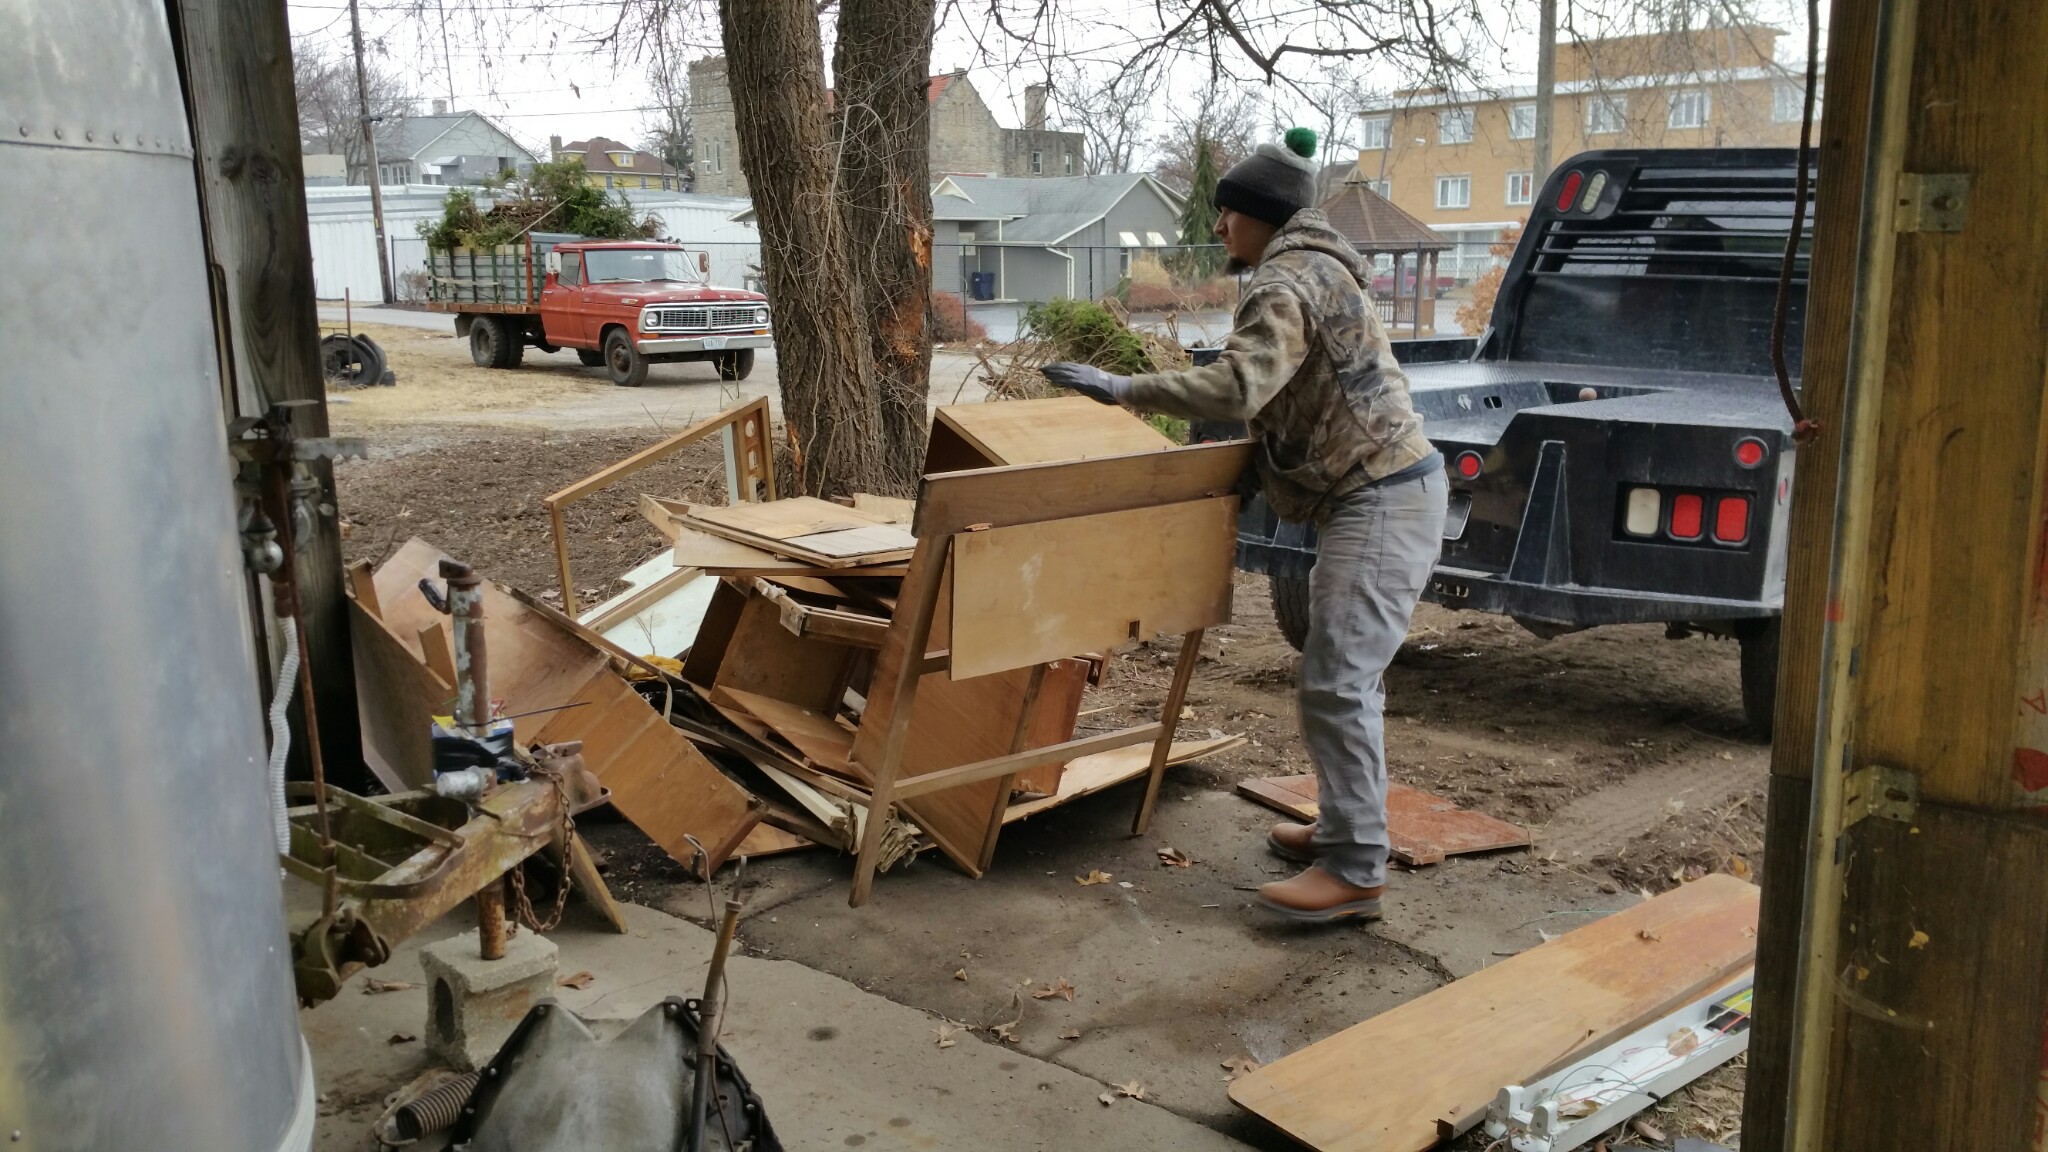
We had to take yet another hiatus when we discovered our frame would need to be totally redone; we expected it, but when it became our reality we had to, ya know, come up with funds and stuff. ;) Unfortunately we aren’t made of money! So poor Stella [no pun intended] sat a bit unattended for awhile.. but we would visit to get measurements, gander, dream, imagine what we would be doing to re-frame her, etc. Plus spring hit us and we were happy to enjoy the weather, take a few trips to the lake, and do some things to our house [hello flowers!]. Casey has also been using sketchup to design ideas for the interior and that’s been a lot of fun as well!

But we have finally ordered our steel and it’s here, we’ve picked it up, and we’re ready to start making the new frame! And did I mention that we got a STEEL of a deal?!? ;) We have to decide what place we will be using while we make the new frame. We have a few options, we just have to figure out which will be best. We can’t wait to get started! I have no knowledge of such a task, but of course Casey does and I’m excited to learn a few things and watch the masters work.

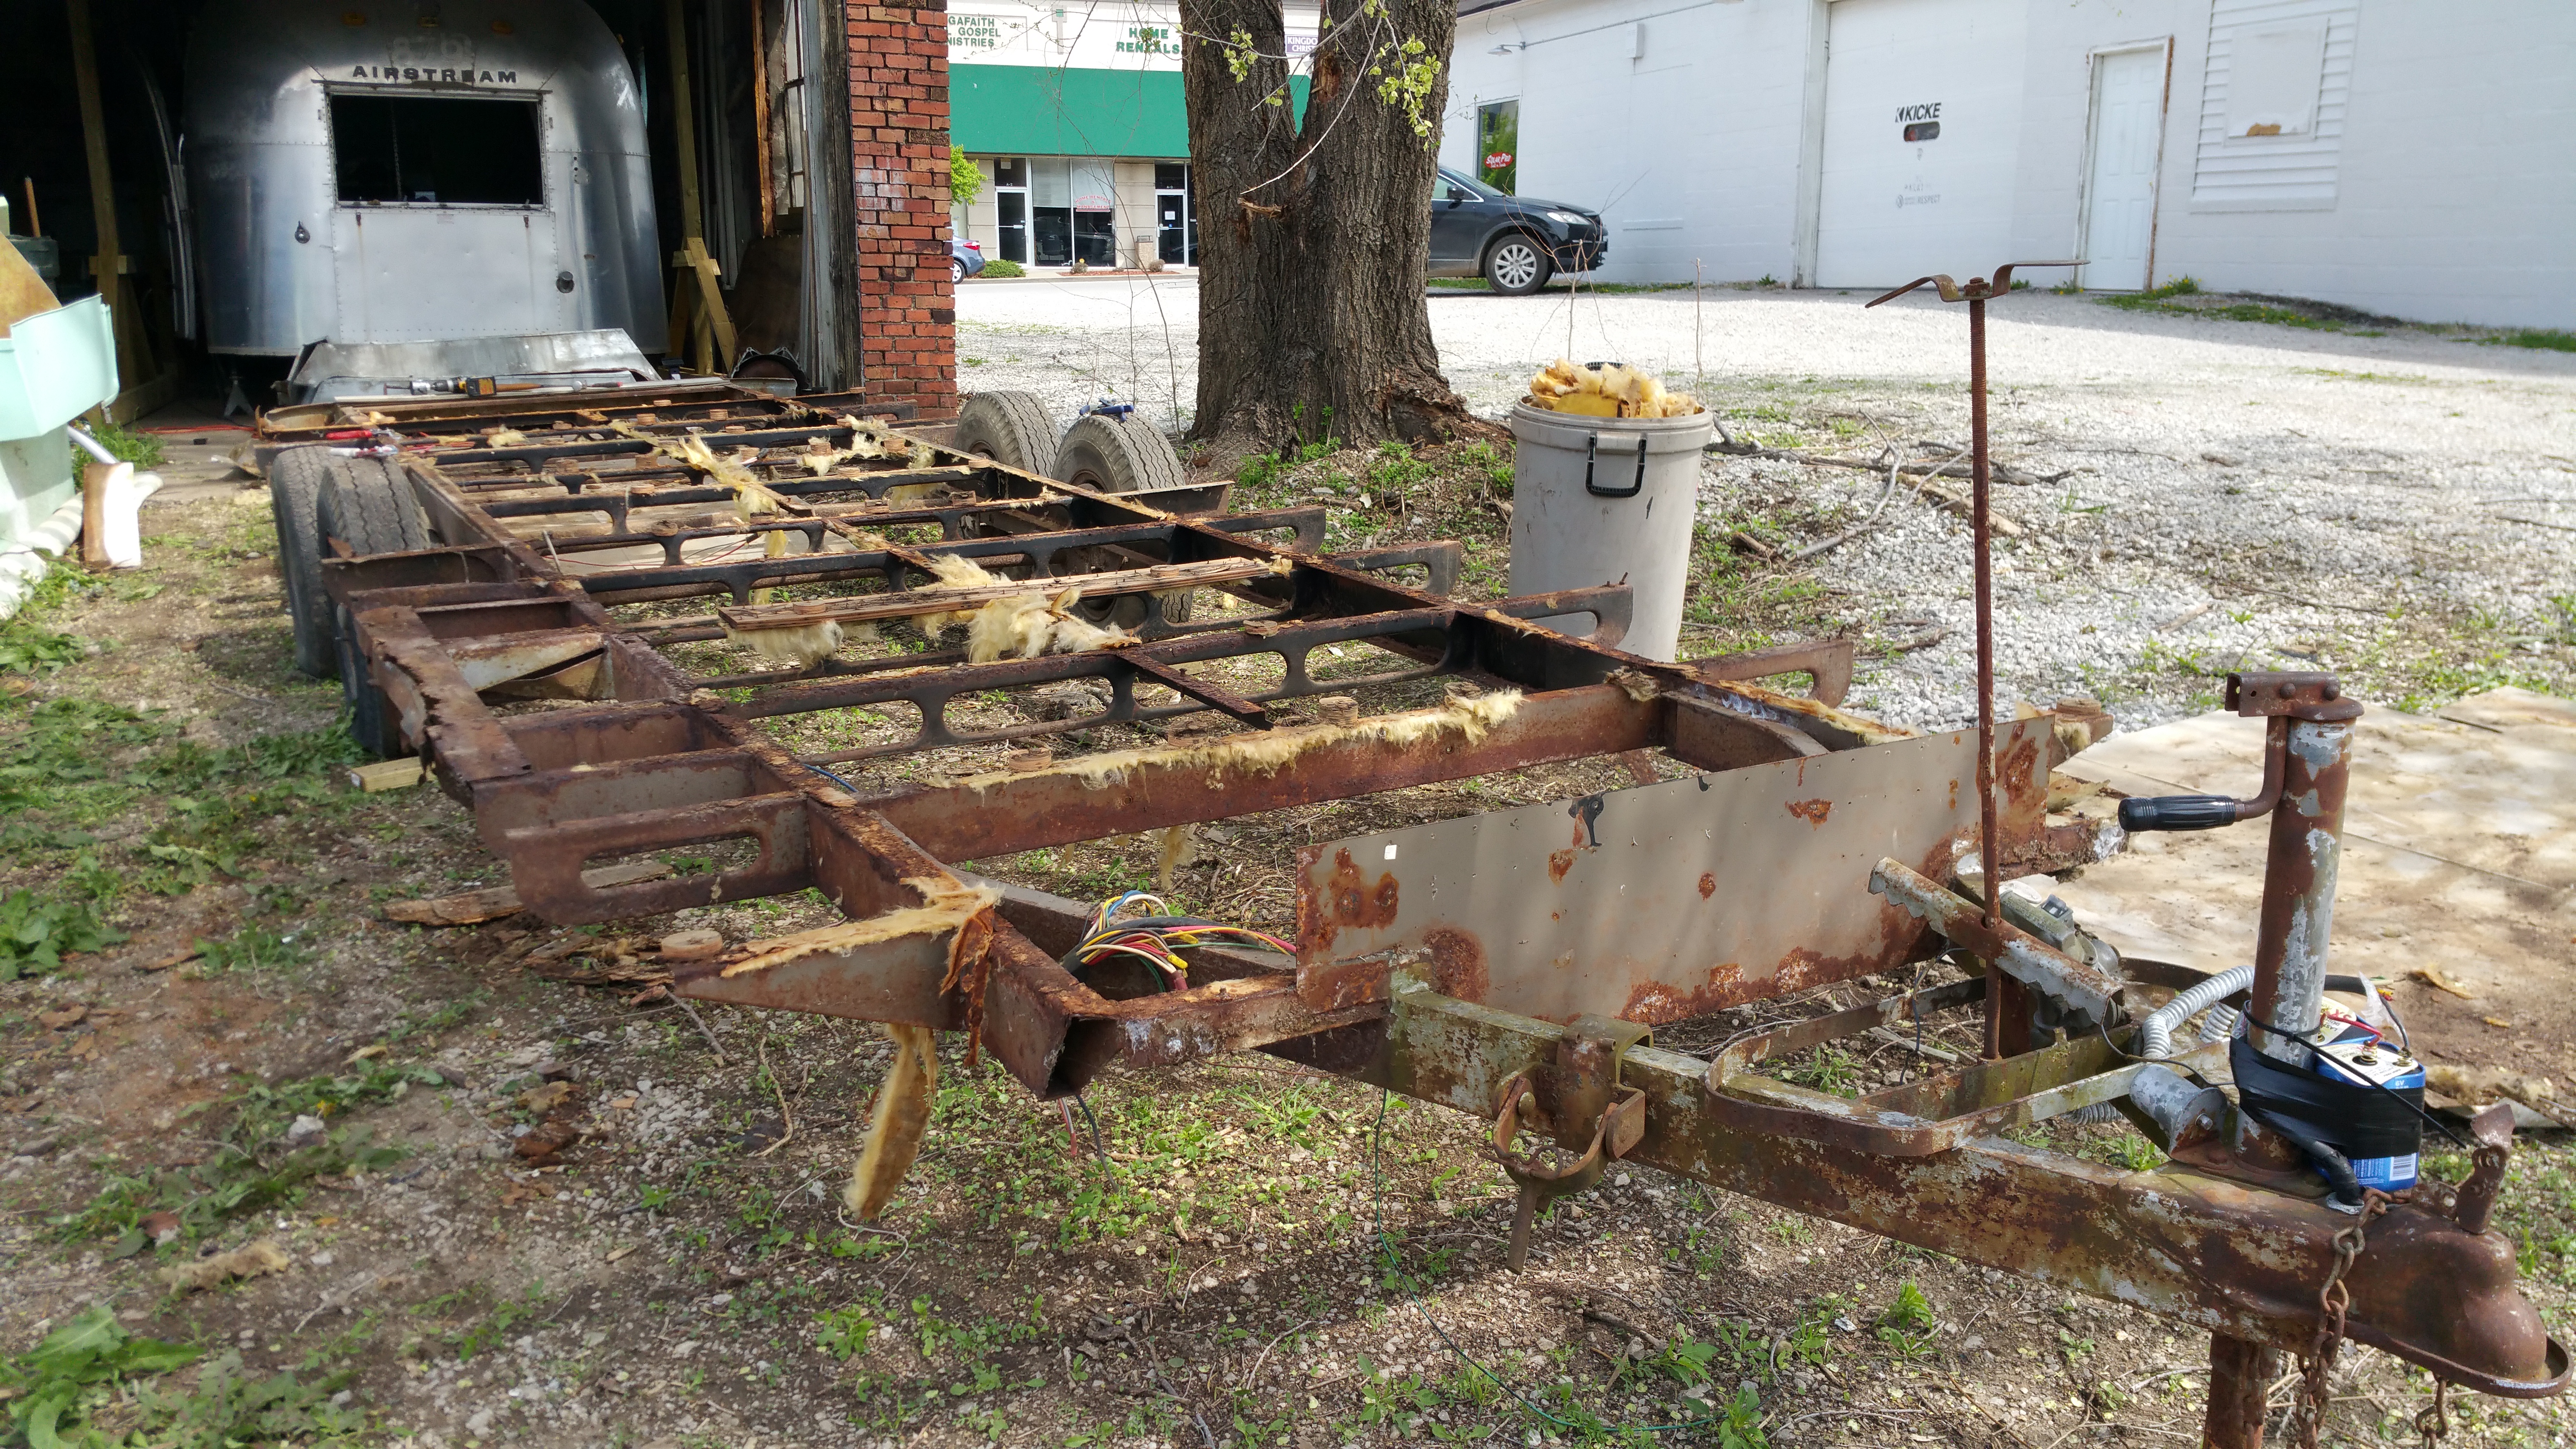
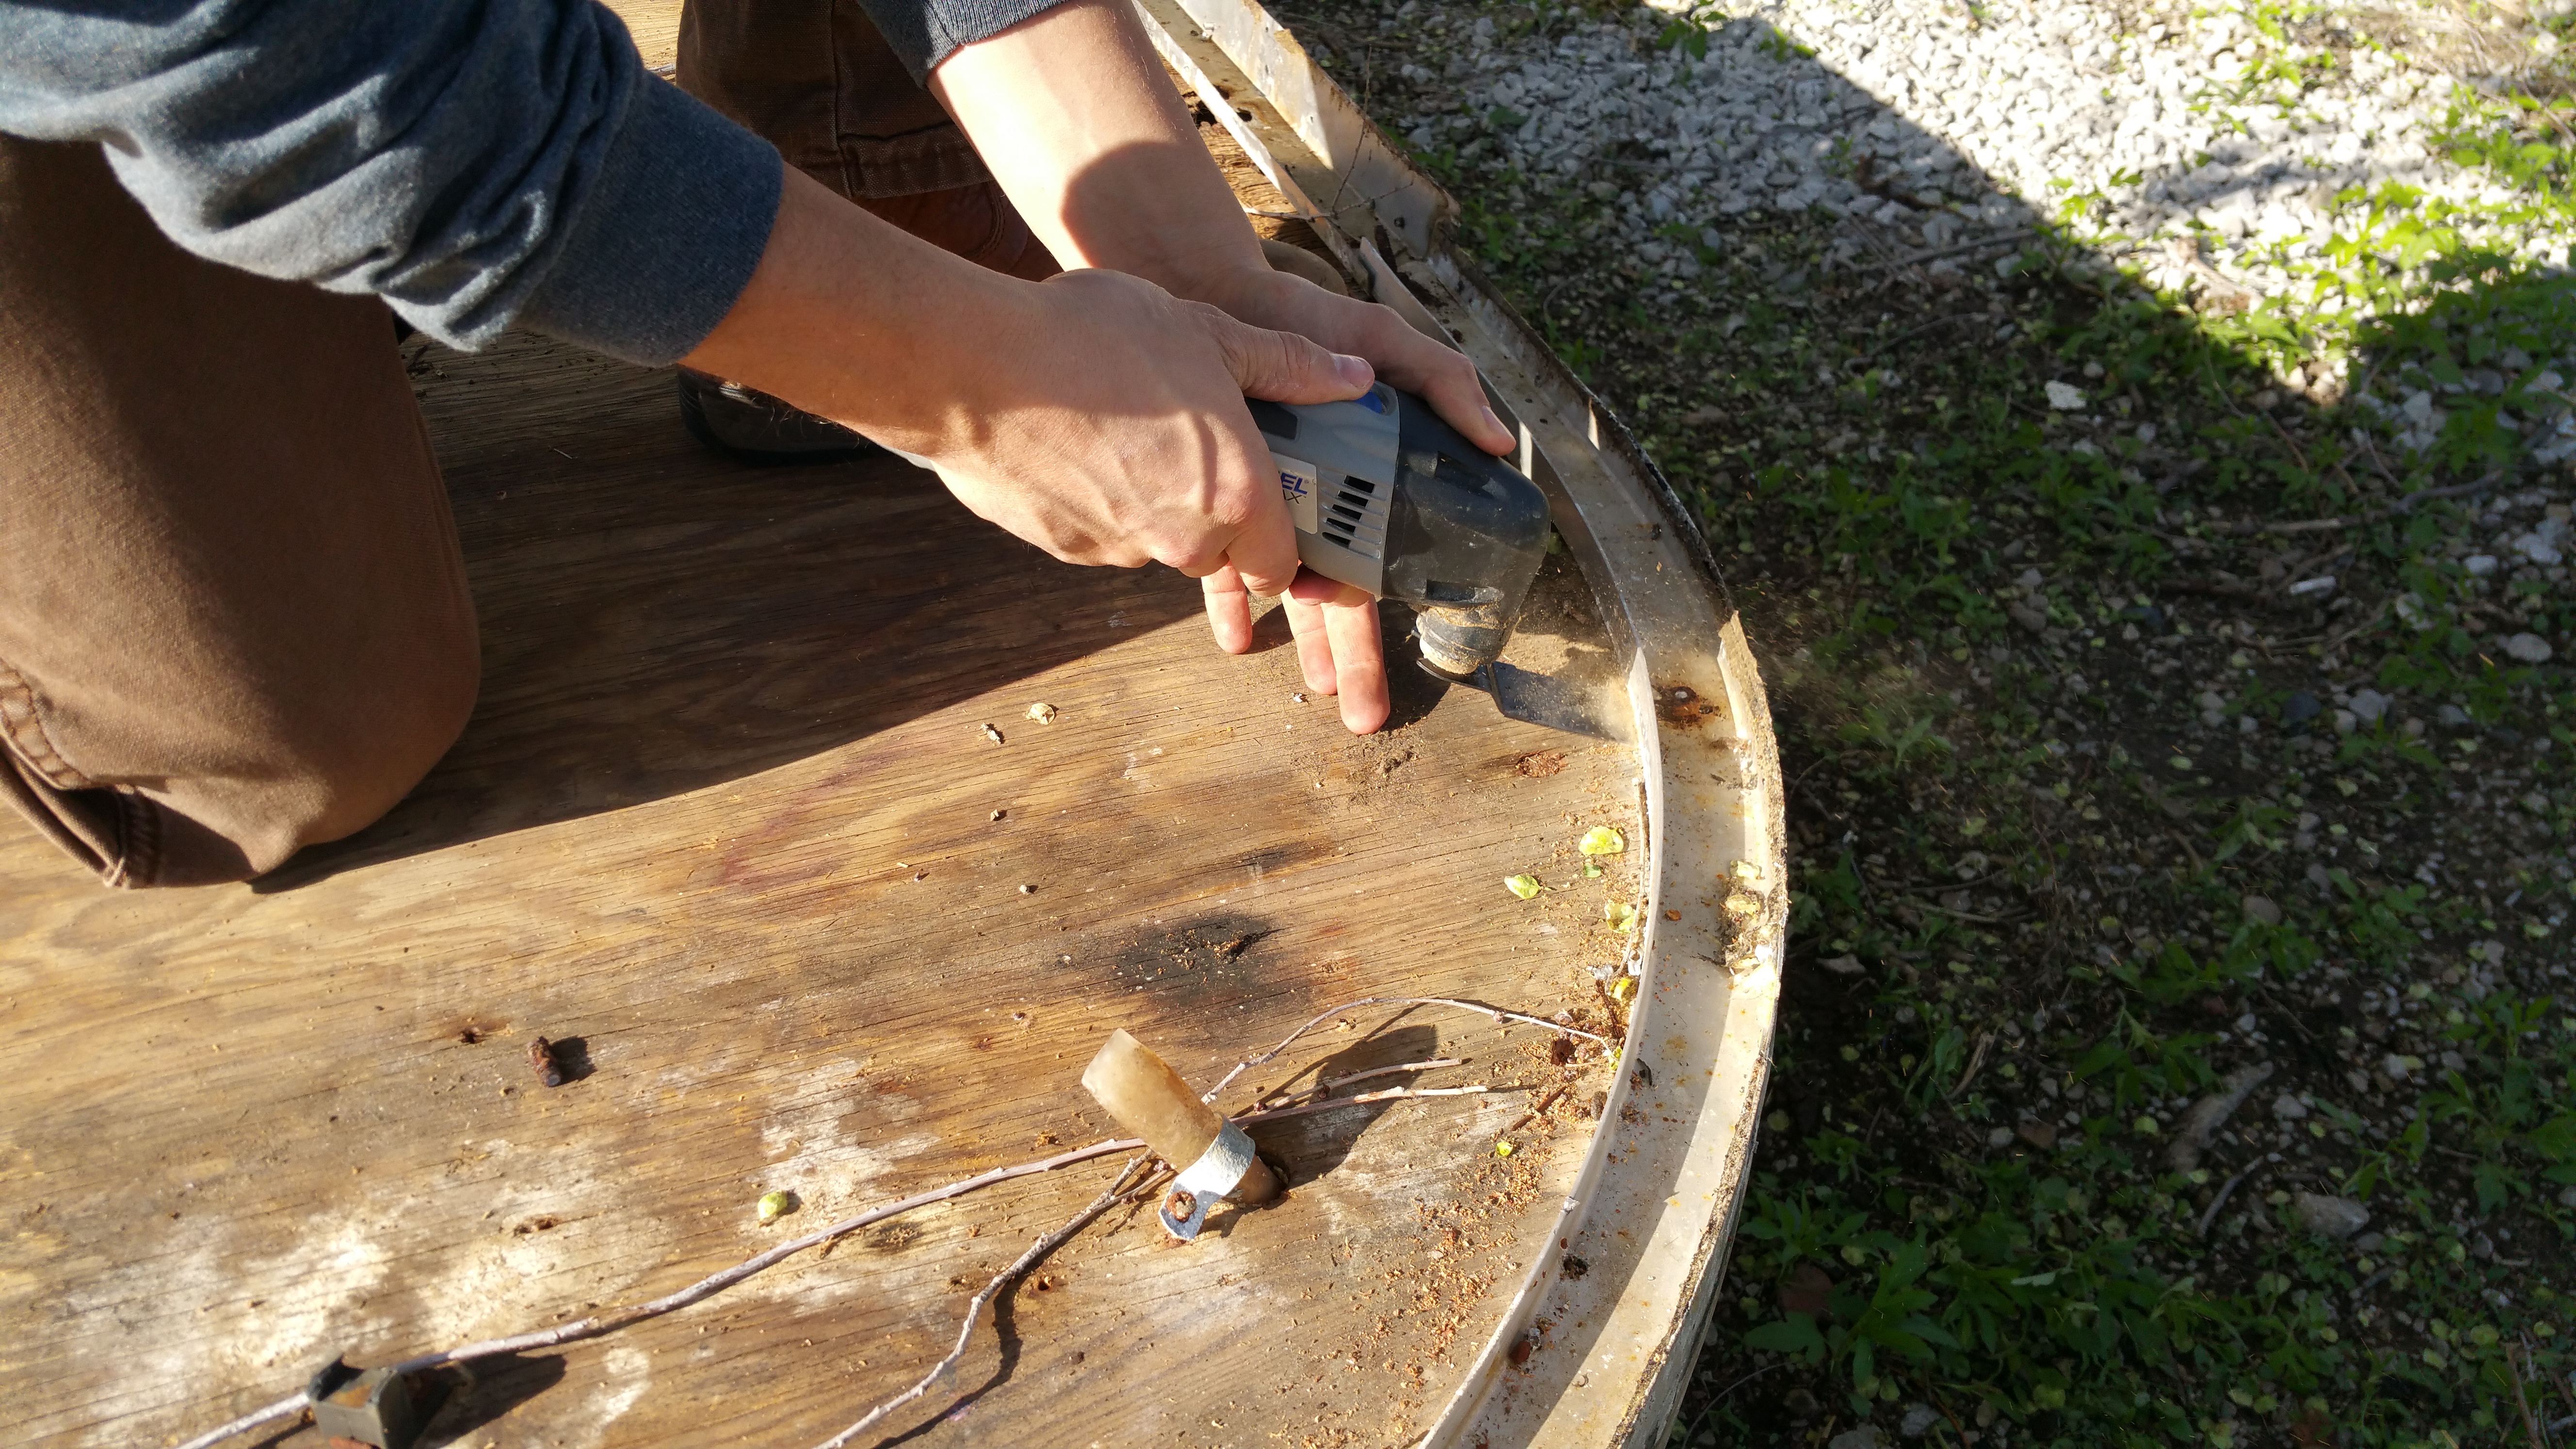
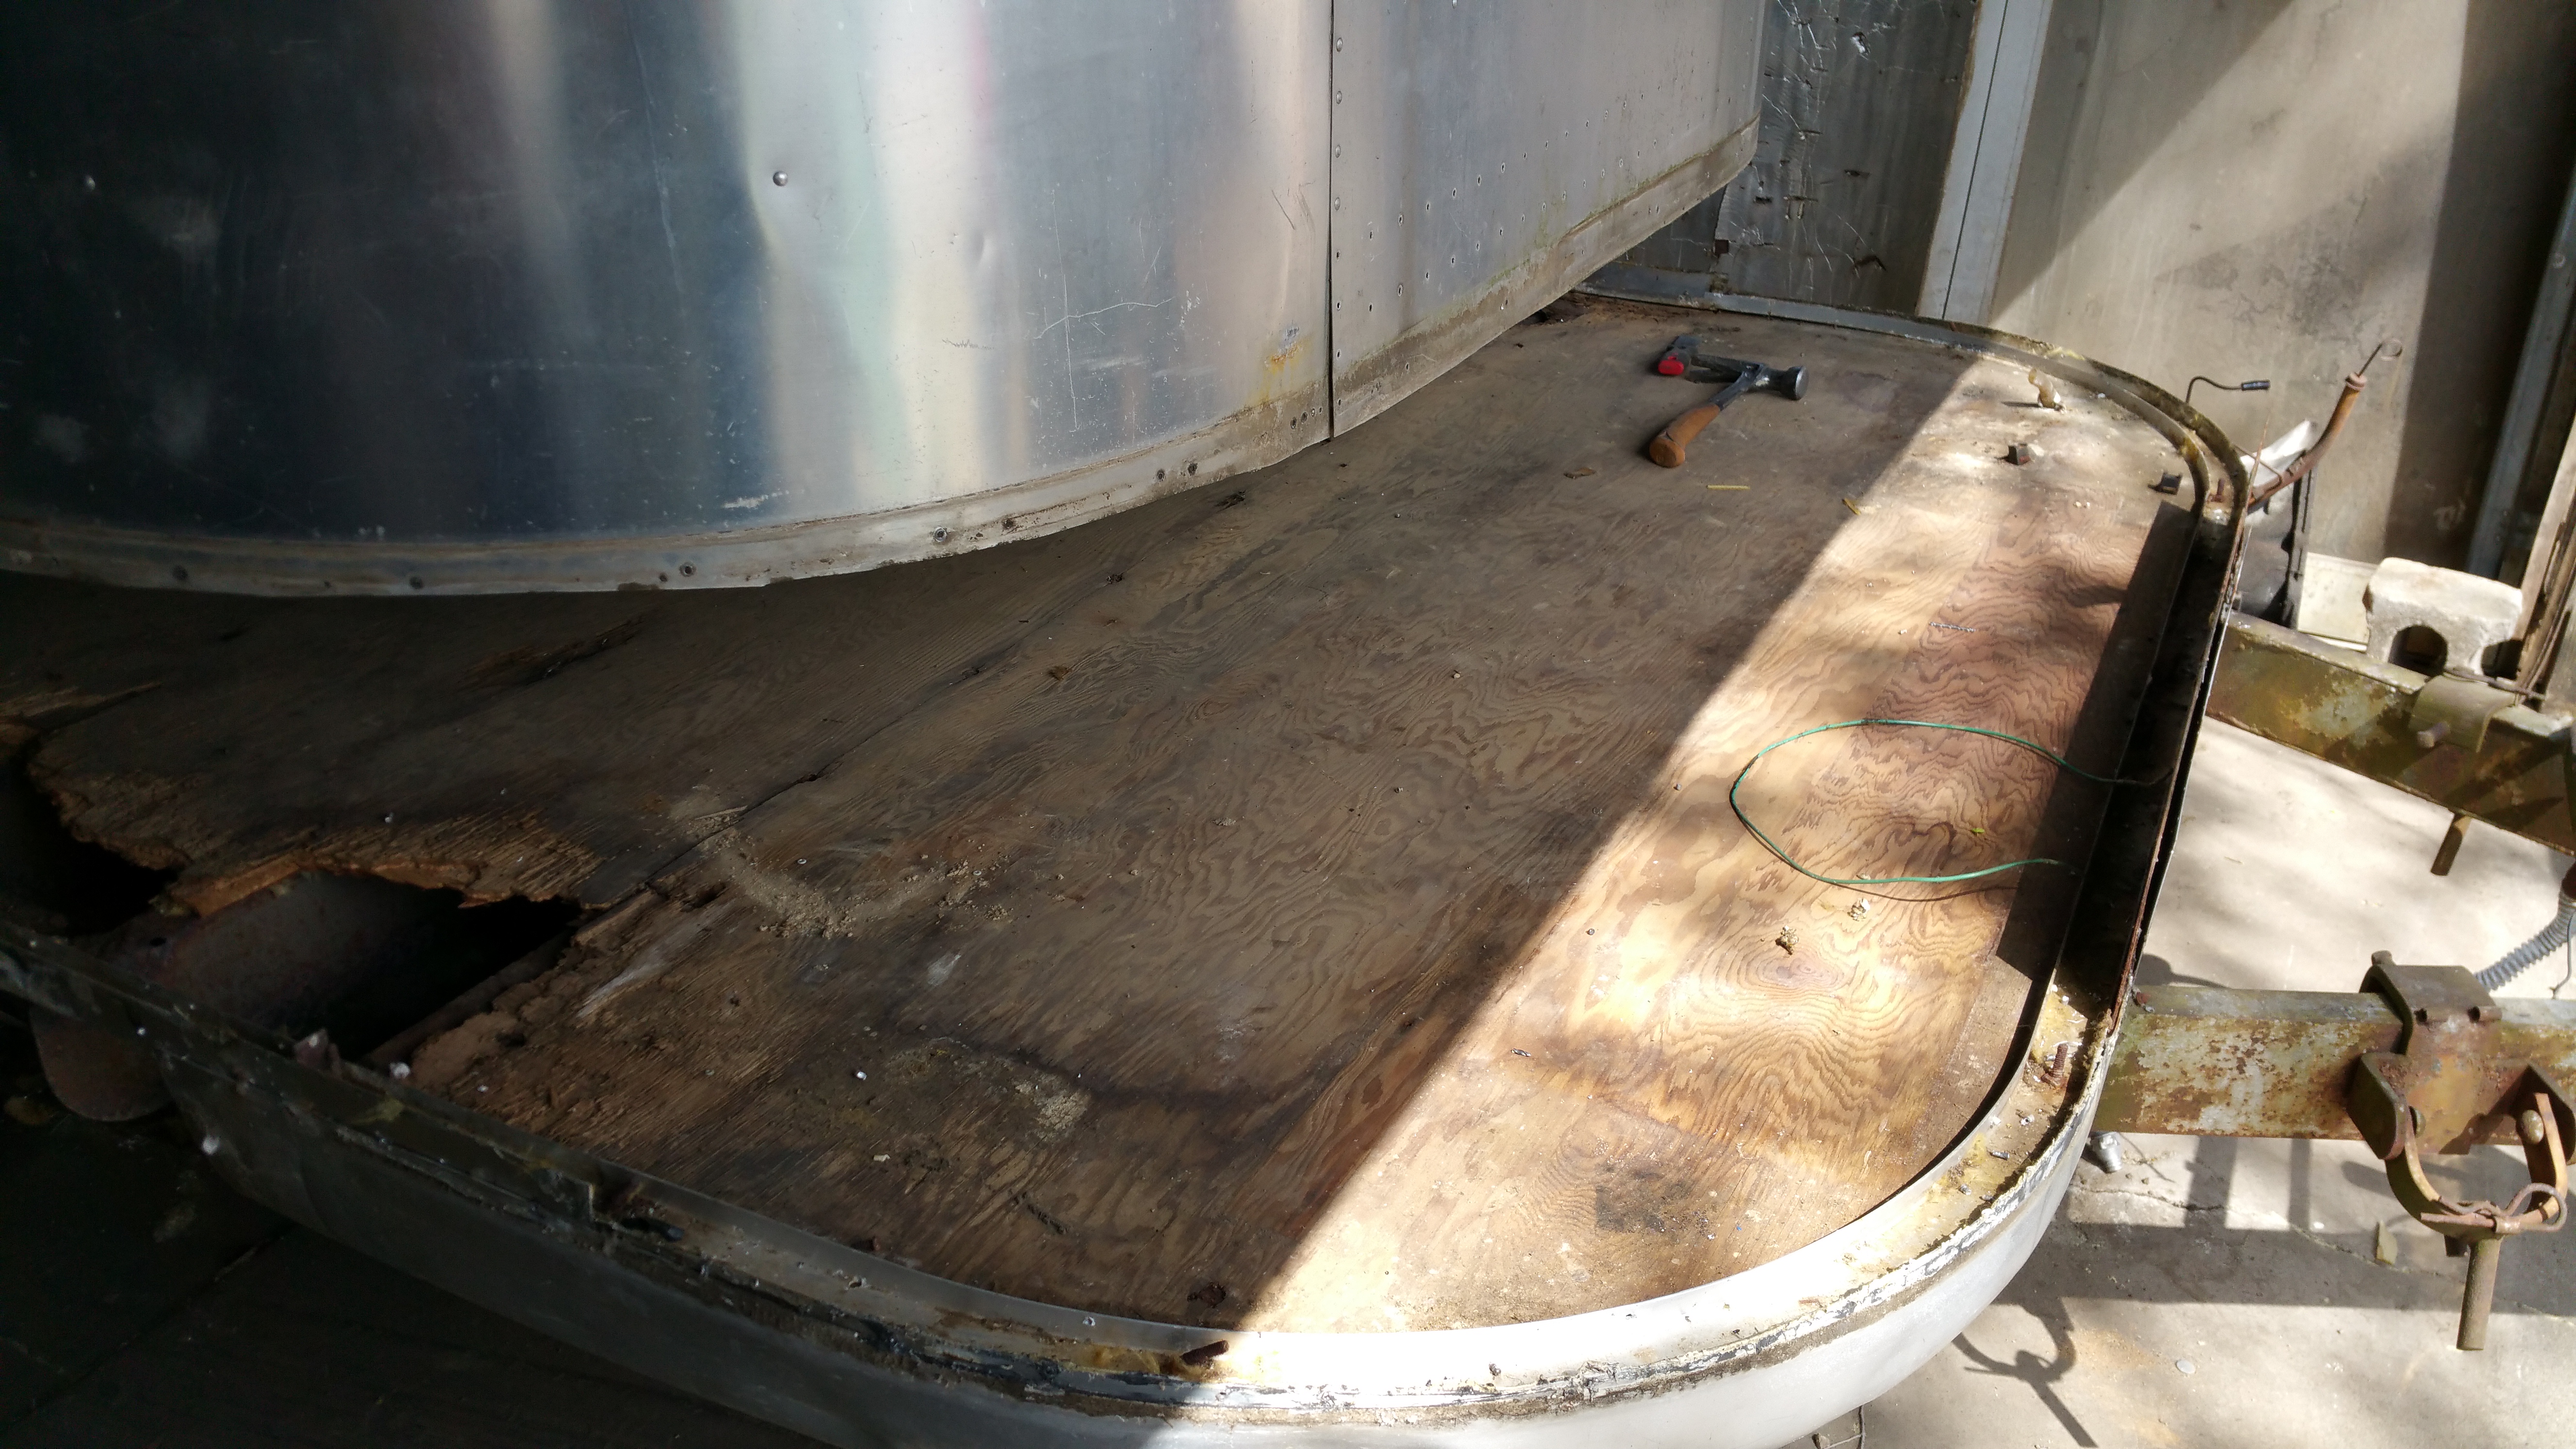
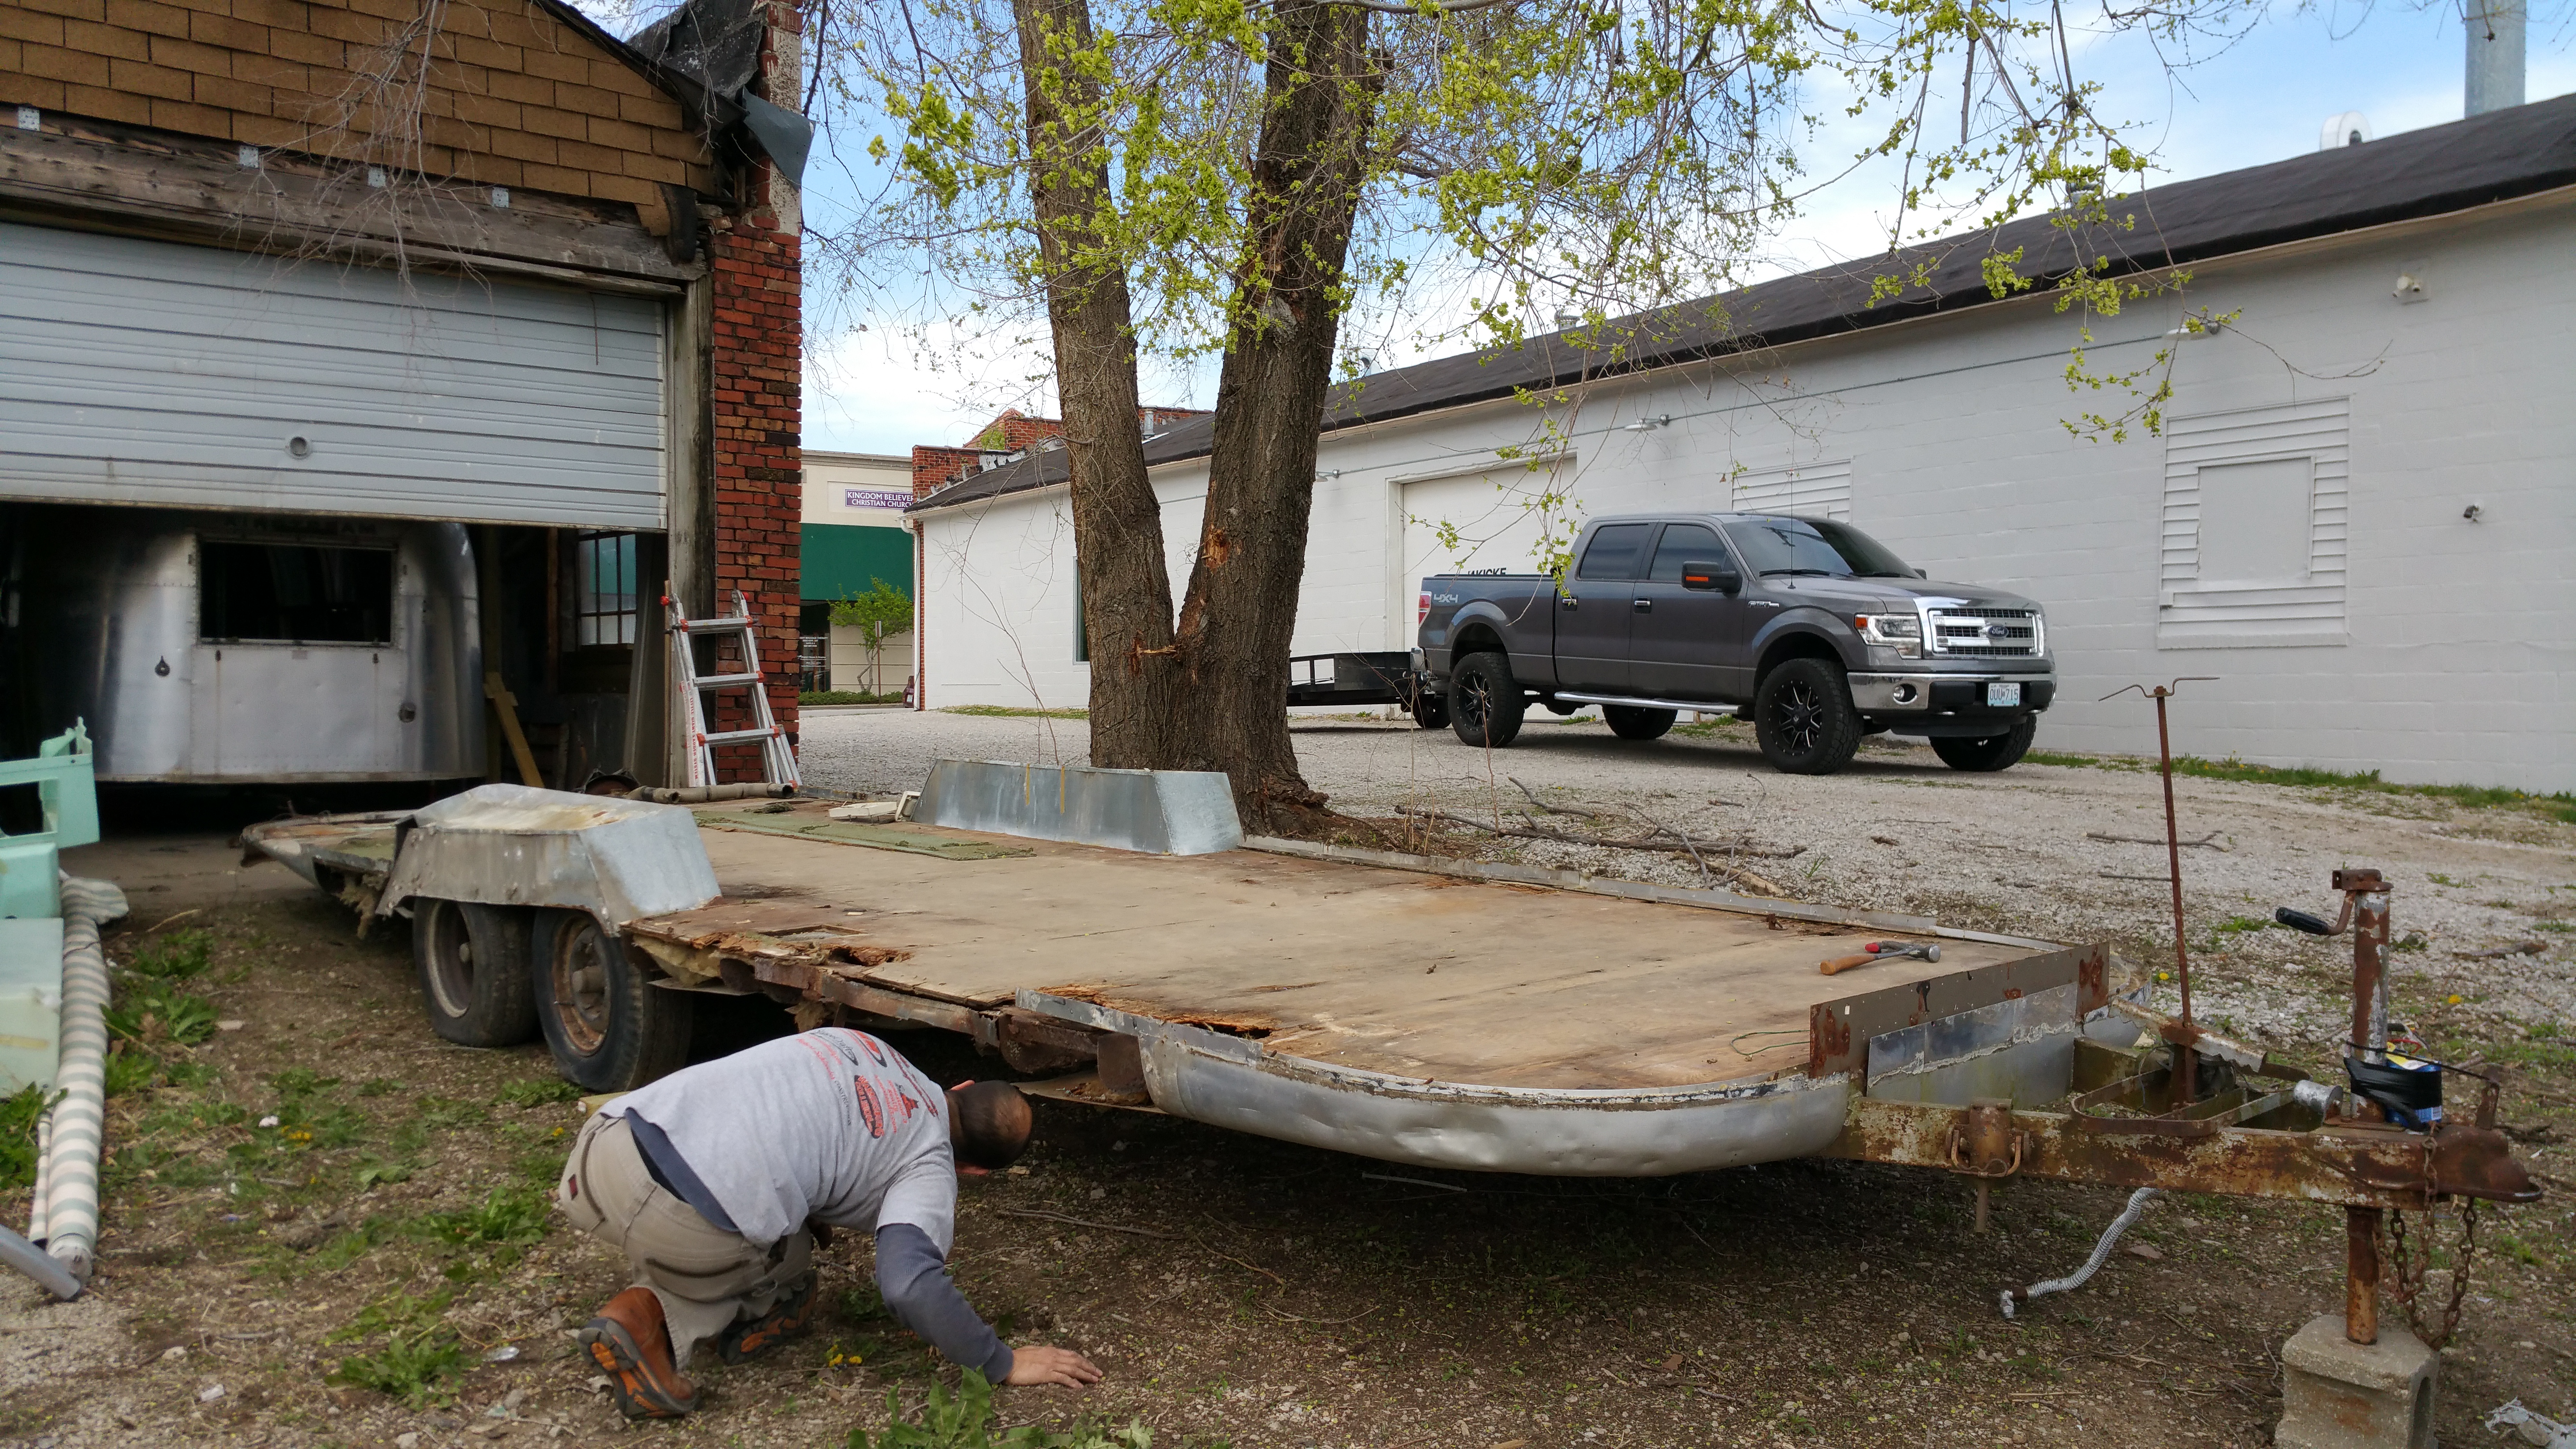
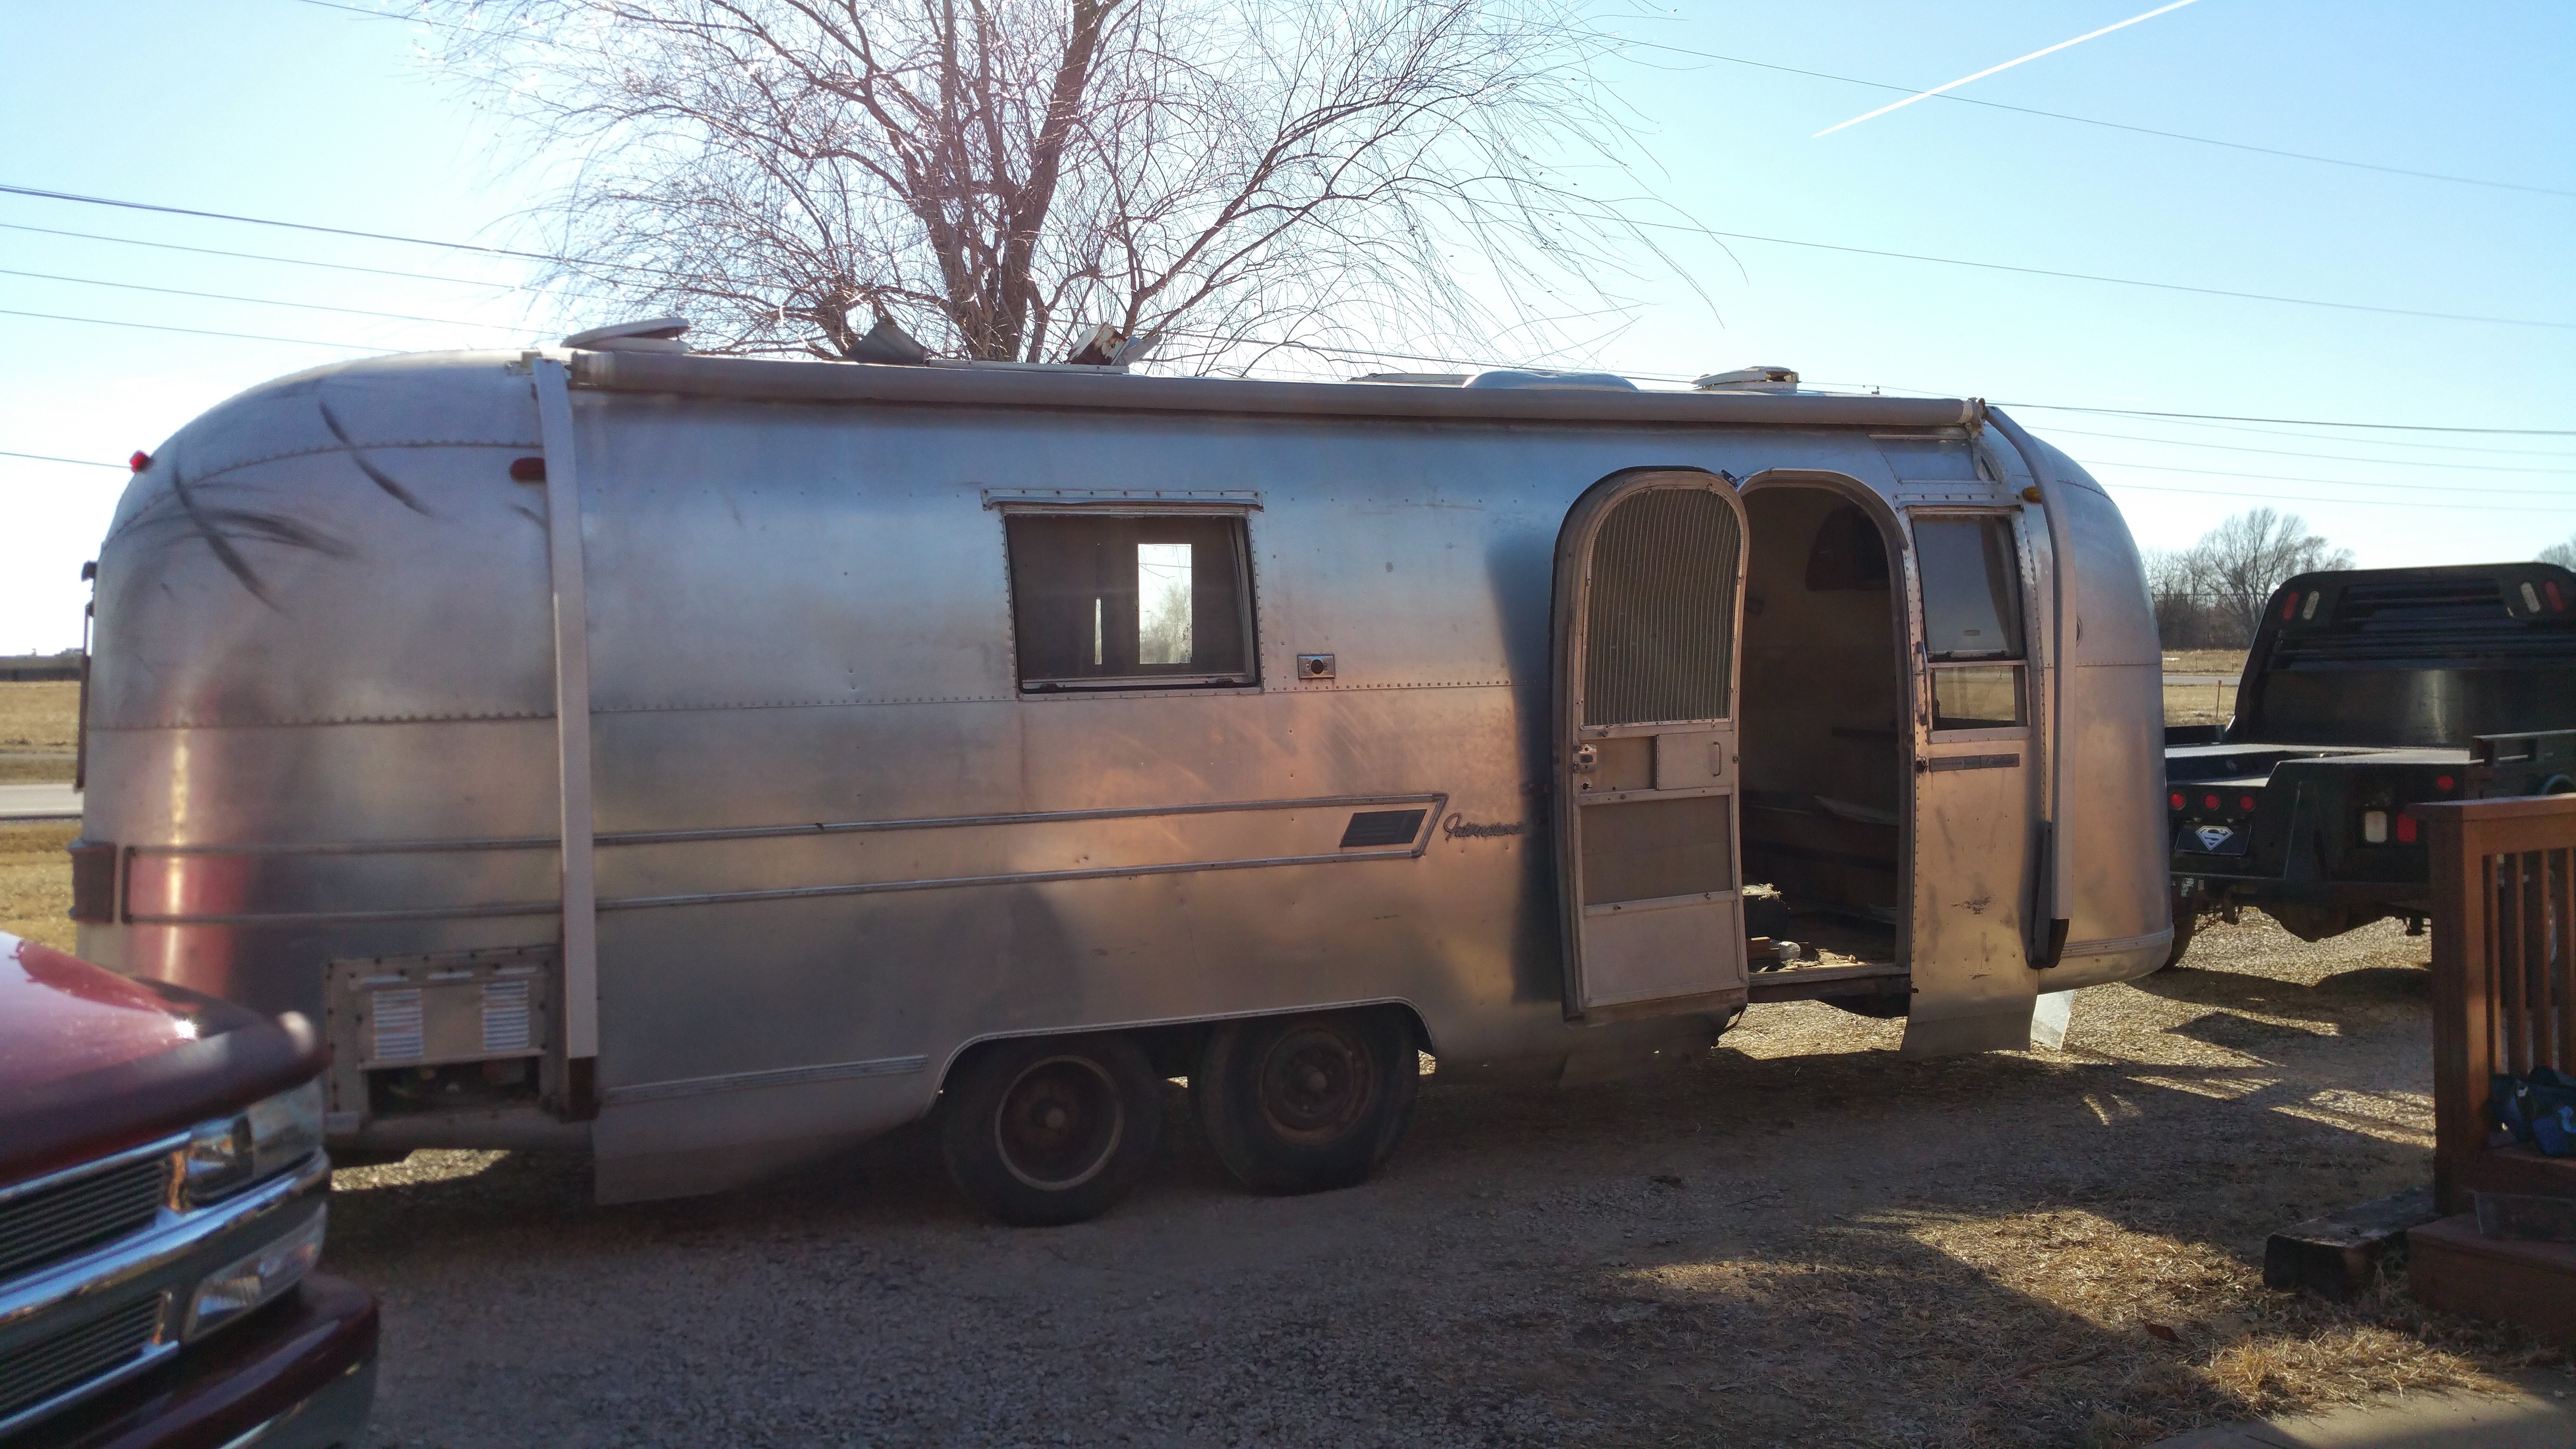
We towed the existing Airstream frame to the shop that we picked the steel up from – and without the body on it – the frame was BOUNCY. Like, I kind of feared for our lives while we drove down the road. It was the longest 7 minute car ride OF MY LIFE. My eyes were glued to the mirrors to make sure the frame didn’t crumble at every bump we hit. Before picking up the steel, we made sure to air up the trailer tires to ensure the safest trip possible, as we used the existing frame as a “trailer” to tow our steel home. We also plan to use the existing frame as a template for the new frame.

20150514_163903

20150514_164300

A photo of our trip to GET the steel… one day there will be a Stella in that rear-view mirror! But for now, there are crooked tires and bouncy rusty beams. Yikes!

20150514_165010-ANIMATION

Hey everybody, tell me how awesome my gifs are! Here’s Casey’s friend Jordan loading our steel on the frame.. ;)

20150514_165224-ANIMATION

Aaaand my hot boyfriend strappin the steel down.

20150514_165125

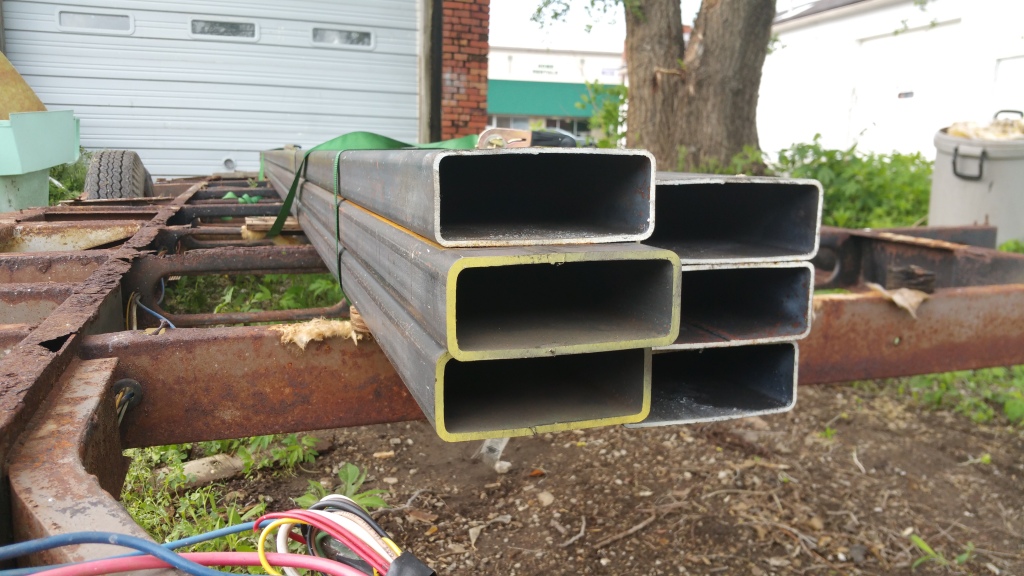
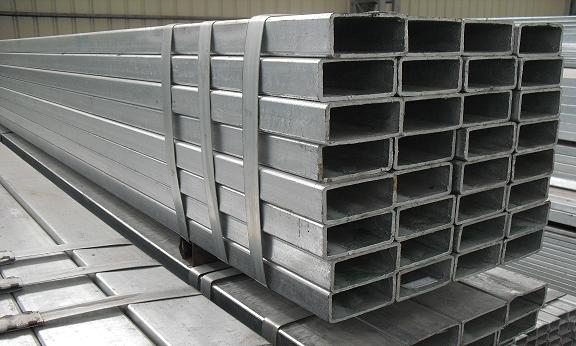
Casey ordered six 24 ft pieces of steel; two that are 3/16″ [outlined in yellow in the picture below] and four that are ⅛”. The thicker ones will be the main rails of the frame, and the thinner ones will be used for the cross members and the outriggers. Originally we had not planned to get all 20ft pieces, however if we would’ve ordered shorter ones we couldn’t have gotten them as quickly as we did, so Casey went ahead and got the 20ft pieces and we will just cut them to size. In total, the steel weighs about 940 pounds. Cheese and rice!

20150514_170828

Next, we have to order new axles! Casey says we have to have them ready once we weld the frame. Hopefully we get to start welding soon.

20150514_170533

Steel has never looked so beautiful :)

Frameworthy Plans

The spring rain has made working on our Airstream a bit troublesome this weekend. I love the rain because my flowers are looking great, but jeesh it makes working on Stella unpleasant! Which makes it hard to keep up with the blog, because I don’t have fun pictures to post! We did have a clear Friday night, but we spent it at the Royals game and we weren’t too mad about missing an evening of work on Stella in exchange for a KC victory! #wemissyoubillybutler

Since we couldn’t go down and work the rest of the weekend, we have been tossing around ideas for the frame remake. And as I always say, I am REALLY glad that Casey knows what he’s doing; he’s a jack of all trades that one. He explains to me what he’s got brewing in his mind in regards to everything Airstream, and I am always having to google everything so I know what he is talking about ;) I can really learn a thing or two [or a hundred] from him!

We plan to use the existing frame as a template for the new frame. Building the new one right on top of the other.

We plan to use 2 x 5 x 3/16 tube. Being that I know nothing about steel.. or frame making.. or anything of the sort, I had no idea that you could use tubing to make the frame of an Airstream.. that just doesn’t even sound safe or sturdy! Turns out, this particular tubing is not plastic. Steel tube looks like this:

We Casey debated whether we should use steel tube, or if we should use steel channel [below].

The existing frame is made out of channel so we considered going that route, however the tube will be stronger and will add very little extra weight compared to the weight added if we were to use the channel. The benefits of the tube outweigh the cons and we’d rather be extra safe and not have to [ever] do this again.

Not EVERYTHING will be brand new; we will reuse the tongue of the frame as well as the back bumper with the storage area original to the Airstream.

20150411_114646

The tongue …

20150411_110824

The bumper …

We haven’t set in stone that we are going to go this route, but we’re about 97% sure. Provided we don’t get any convincing advice otherwise from here on out, we will be going with the tube. Any of you guys have different ideas about how the frame should be made? We’re open to input! And we’re hopeful for sunny days ahead to see what we can do about working some more!

Who Framed Stella ‘Stream?

We may not have done it originally but unfortunately, we’re gonna have to this time around.

Friday after work we took advantage of the nice, RAIN FREE weather and went down to the shop to start ripping up plywood on the frame. Because of the elevator bolts underneath the plywood, Casey had to use a hole saw to drill out around each of the bolts. This allowed us to separate the plywood from the bolts so we could pry up the plywood.

20150410_172000 20150410_172441

There’s that pesky elevator bolt! Those things are a real mystery to me..

20150410_172455

Once we’d drilled out around all the elevator bolts, Casey had to start cutting through all the rusted out bolts that were holding the c-channel down to the frame.

20150410_173453 20150410_173942 20150410_175057

We make sure to label all the pieces that we plan on re-using or that we are going to use as a template. SS for street side, CS for curb side. These are the rounded parts of the c-channel that we are going to re-use. We’re going to remake all the straight pieces, but since the hard part has been done for us with the curved pieces, we’re going to keep them. Work smarter, not harder. ;) Time to pry off the plywood!

20150410_174911 20150410_175356 20150410_175442

Yikes.. it’s looking about as bad as we hoped it wouldn’t. Maybe even a bit worse. :(

20150410_175543 20150410_175632

After getting half the plywood off, we called it a night. All of our batteries for the drill had died and we couldn’t charge them fast enough to keep up a good working pace. We returned early the next morning to finish the job. Pulled up all the ply wood and removed the wheel wells.

20150411_110302 20150411_111251

Surprisingly, the parts of the frame underneath the wheel wells were in the best condition. My theory is that the windows in the front and rear of the Airstream were all broken out, so those areas were more susceptible to nature getting inside than the middle of the body. But what do I know. What we DO know is that it looks good in that area, but not good enough to salvage the frame.

20150411_112717

It looks like this most everywhere else! :( Once we’d gotten all of the plywood off and all of the insulation removed, Casey took a putty knife and a hammer and knocked out all of the rivets on the bottom of the belly pan. Originally we planned on using the gantrys to flip the frame and doing this differently, but since there is no saving the frame we just went to town on the rivets. We’re going to replace almost all of the belly pan aluminum; the only part we are going to keep is the banana wraps – the front rounded corner pieces. Again, we are trying to work smarter, not harder.

20150411_112141 20150411_113742

To make removing the belly pan easier, Casey cut it in half so we could pull each end out separately.

20150411_113901

This is the front of the belly pan with the banana wraps we are going to re-use. And a bunch of old, stinky, still scratchy insulation. My face was on fire after I picked it all off the frame!

20150411_114646 20150411_114628

Here’s the frame in all her glory. If that’s what you want to call it. It’s a stinkle it has to be re-done, but silver lining: Casey gets to work on his welding skills. That’s a good thing, right?

& We Have LIFT-OFF! Hoist Me Up Scotty!

GUYS. I have a feeling this is going to be heavy on the pictures. Today has been the most stressful, nerve-wrecking, yet successful day of restoration so far!

_DSC0879

On Friday night we drove to Harbor Freight to buy the chain hoists and tow straps (above) we needed to lift the body off the frame. Saturday we were busy with other things, but this morning we were able to go down to the shop with plans to finish out our gantrys and maybe put the support braces inside the body for stabilization (for when we lift it). But one thing led to another and by the time we left the shop, the body had been hoisted, the frame had been removed, and we were full on high-fivin and victory dancing in the drive way – super proud of ourselves – and also super shocked that we’d actually done it!

The first thing we did this morning was finish our gantrys.. which involved both Casey & I climbing up sketchy ladders and lifting the 10ft long 4x4s across and over the Airstream and securing it into both side pieces of the gantrys. Now, I have no upper body strength. And I’m also not good on a ladder.. which means A + B should not equal successful placement of the beam. Above my Airstream. But I freakin’ nailed it! Casey and I were able to get both beams on both sets of gantrys with no harm done to either us or to Stella, save a few splinters. We also added a few cross braces to further stabilize our beams across the top in an attempt to prevent the beams from bowing under the weight of the chain-hoisted body.

_DSC0843 _DSC0868

_DSC0852 _DSC0861

After an hour and a half of finishing up our gantrys, we moved on to the interior of our Airstream. While it’s possible to lift the body off without the support beams we added, there’s further peace of mind knowing that they are there. So we went ahead and screwed those in – 3 spaced through the interior.

_DSC0887 _DSC0997

Once they were secured to the Airstream, we worked our way up and put our chain hoists on the gantry beams. We made sure to center the chain hoists on the beams as well as move the gantrys so the chain hoists were centered in our vent holes in the ceiling.

_DSC0937 _DSC0924

_DSC0989 _DSC0959 _DSC0961

Hindsight, Casey said we should’ve wrapped the tow straps one more time on the gantry beams. Once we had the chain hoists hung, we took our 16ft 2×6 and laid it long ways in the Airstream so it would line up with both vent holes, then wrapped a tow strap around each end 3 times and hooked it to each chain hoist (the pictures below show the beam only wrapped 2 times, then we changed our minds and went ahead and wrapped again).

_DSC0971 _DSC0969

Since we had the chain hoists hung, the beam run through the inside of the Airstream, and the support braces in, we thought, “well why don’t we just prep the Airstream for lift-off and make sure we didn’t miss any hidden rivets..” and so that’s what we did. ;) We found a few hidden rivets, as well as took our putty knife around the whole Airstream to make sure the top would separate from the bottom and we weren’t missing anything. It also helped to loosen the glue a bit as well; there is a LOT of glue!

_DSC0998

And then, since we had gone that far, we thought maybe we should just *test* run the chain hoists to see if it would lift off the frame just a liiittle bit.. and well, it did.

_DSC1016

And then, it lifted just a little bit more.. ;)

_DSC1021

AND BEFORE WE KNEW IT WE WERE AIRBORNE AND THERE WAS NO TURNING BACK!

20150405_143746

And well, we couldn’t just lift the body off.. if we went through all that trouble, we should probably just go ahead and remove the frame, right?! So we did that, too. :)

20150405_145552

20150405_151734

OMG! THINGS ARE HAPPENING!

20150405_150438

There is the body! OFF THE FRAME. STELLA IS IN TWO PIECES!

20150405_152236

Another view looking the opposite way! The last thing we did was set the body down on 4 jacks so it wasn’t swinging in the air. They’re a wee bit visible in the picture above. Also, it should be noted that we are forever indebted to our dear friends CJ & Gloria for helping us to guide Casey in driving the frame out from underneath the body. There’s no way just Casey and I could’ve done it alone; we needed all 3 sets of eyes! Thanks guys!!!

After 3 hours at the shop we had more than successfully completed what we’d set out to do, and we wrapped up just in time to celebrate Easter with the family. The day was stressful. And nerve-wrecking. But oh so satisfying. We didn’t spend much time dissecting our frame, but we will probably go over sometime this week to check it out. I was getting rather hangry and it was getting to that awkward time of day where it’s to close to dinner to eat a meal, but you’re to hungry just to have a snack. I’m still anxious about Stella’s body just sitting there unattended; I don’t want anything to happen to her! But I know she’ll be okay and that this is a necessary step in making her our dream ‘stream. :)

Goodbye Winter, Hello Stella!

_DSC0470

It’s been a long hiatus – sorry for that! We got a few weeks of cold weather which makes working on the Airstream rather undesirable. Plus, our friends at Solar Pro Tint-N-Tunes had plans to move shops, so Casey spent a month helping them fix up the new one! We were busy! If you’re ever in our neck of the woods and need any window tinting, stereo systems, etc done to your vehicle – call the boys up at Solar Pro! They’re the best in the business. :)

Anyway, over our hiatus we didn’t completely abandon our Airstream. We finally got all of the exterior rivets drilled out. Stella is ready for lift-off! The next step was building the gantrys, so Casey & I tackled that today. It’s a good thing Casey knows what he’s doing! He’s so good about researching all about the stuff we’ve got to do. You’d think he’s done this before! The 2 gantrys we build are going to be used on each end of our Airstream; they’ll help us lift the body off of the frame. We’ll use chain hoists to jack up the body so we can pull the frame right out from underneath of the body, then set the stabilized body back down while we work on the frame.

_DSC0480

Oh hey there, Stella! We’ve missed you. Also, I got a nice camera for Valentine’s day so I got a wee bit picture happy but man do the pictures look better! Look at that sawdust fly! Impressive. ;)

_DSC0488

We built the base of our gantry frame with 2x6s and 4×4 blocks – four total bases.

_DSC0499

Then we stuck a 12ft 4×4 in the middle of that bad boy, screwed it in, and put some braces on either side made of 2x4s with nicely mitered edges – also screwed in place.

_DSC0523

Casey with our first semi-completed gantry! Just before we added the brace. I wondered if they would be tall enough to clear the Airstream, but I guess the height of posts is quite the optical illusion when they’re laying down… they were way taller than I thought they’d be once we stood it up!

_DSC0537

We added braces on either side of the gantry post for extra stability.

_DSC0552

And lastly, we added some braces at the top so we can easily drop the 10ft 4×4 across the top once we get them erected and fully assembled. The 4×4 at the right of the picture was just what we used to determine how high we needed to add the braces so the 10 footer would fit in there snuggly.

_DSC0561

I tried 100 times to get a good picture of the gantry posts around the Airstream, but it just wasn’t happening for me…. but if you look close enough you can see the two rear gantry posts sitting next to the Airstream inside the shop.

We’ve gotten the 4 posts of the two gantrys built and ready; we didn’t have a ladder at the shop so we couldn’t put the gantrys together, but we will soon. All that’s left to do is run a 10ft 4×4 across the top of each gantry and lag bolt them together. Then a trip to Harbor Freight will be in our future to buy some chain hoists and we will be in business! I’d be lying if I said I wasn’t nervous about lifting the body off the frame.. but I trust that Casey knows what he’s doing. We’re anxious to see what kind of condition the frame is in once we pull it out from under the body. We’re hopeful it’s repairable, but we aren’t holding our breath.

We’ve considered a few changes to the layout of our Airstream… mostly right now we are considering a composting toilet over a black tank, and whether we could move the bathroom from the rear of the camper to the side and squeeze a bed next to the bathroom at the rear of the Airstream. I measured the width of a full size bed and mapped it out in the Airstream…………… don’t think it’s gonna work. Maybe we can swing it, I’m not sure. I think it could make the layout of the Airstream more efficient if we could! Mostly we are just excited it’s officially spring so we can spend more of our time with Stella!

_DSC0541-2I spy Stella and Casey in the background ;)

I have ONE stipulation for our Airstream Kitchen…

I GOTTA be able to make Japanese Curry. On the regular. That’s it. That’s my one and only stipulation for the kitchen in the Airstream.

Due to Valentine’s Day yesterday, we didn’t work on Stella this weekend. I’m not severely mad about it; it was freezing this weekend anyway! We spent our Valentine’s Day at Ikea looking for things we could use in our Airstream once we get to that phase of our reno, plus of course buying a few things for our house. And today, well, let’s just say we are (really) late to the Breaking Bad party and we’ve been watching episodes like it’s our job. Thanks Amazon TV. So I thought in lieu of progress pictures this weekend, I’d share our most favorite recipe probably ever.

I was given the great opportunity of living in Japan for a few years in high school and if there is one thing I miss most about Japan, it’s the food. Really, most everyone I know from my Japan days misses the same thing. Most specifically, CoCo’s curry. In my opinion, there is no curry greater than Japanese curry, and no better place to get it than CoCo’s.. unless of course, you live in America with no CoCo’s at your disposal. Lucky for you, I’ve got a way to curb that insatiable hunger for Japanese curry that won’t cost you thousands of dollars and a 15 hour flight. And it’s so easy, you can make it every week if you want!

20150215_145506

CARISSA’S COCO’S CHICKEN CURRY

Ingredients:

  • 1 packet S&B Golden Curry (any spice you would like; we buy medium-hot) [see picture above]
  • Vegetable oil
  • 1 lb chicken breast (we usually buy stir-fry cut)
  • 1-2 eggs
  • Flour
  • Panko
  • Spices to flavor the panko (we use garlic salt, cayenne pepper, onion powder)
  • Sharp cheddar cheese
  • Rice
  • Naan bread (smothered in butter preferably)

Directions:

  1. Make your rice. We have a rice cooker, so this is always step one for us, however if you don’t have a rice cooker, time the making of your rice to sort of line up with the finishing of your chicken & curry; fresh warm rice is best!
  2. If you buy chicken that isn’t already prepared for you, cut it up into thin strips. 1 inch to ½ inch is what I prefer. If they’re too long, I cut them in half (even if I buy the pre-cut chicken, I usually cut in half). I like ’em small because I don’t care for the taste of chicken.
  3. Make your breading station. I usually set out 3 bowls and put flour in one, eggs in another, and panko with seasonings in the third. I don’t measure the seasonings, just sprinkle till I think it looks good and will be flavorful enough for all the chicken I have to bread – then mix it in with the panko!
  4. In a large skillet, warm up your vegetable oil over medium heat. I like to let my oil warm up while I prep the chicken so it’s nice and hot – ready for me to fry once I’m done breading. I’ve found on my stove that medium/high is best, but closer to medium than high.
  5. Bread the chicken pieces. Flour first, eggs second, panko third. It’s a messy job but someone’s gotta do it! Put all your prepared chicken on a plate so you can take it all to the stove at once.
  6. Fry the chicken! Fry it up in batches – don’t want to over crowd the pan. Usually it takes 3-4 batches, and you want the chicken to be a nice golden brown. But check step 7 before you start!
  7. Half way through frying the chicken, bring 2.5 cups of water to a boil. Once it comes to a boil, break up the block of curry and add the whole broken up block to the water. Whisk it up really good and let it simmer for a few minutes while whisking, then tun off the heat. It should thicken up some with time & heat. (But if you’re impatient and don’t want to wait for it to thicken, it’s just as good thin!)
  8. Once the chicken has all been fried, your curry has set up, and your rice has finished preparing, it’s time to eat! We have a specific assembly protocol in my house; a heaping serving of rice first, followed by a layer of fried chicken spread across the top of the rice, a healthy sprinkling (or handful) of sharp cheddar cheese over the chicken & rice, and ALL topped off with the curry sauce. The more, the merrier! You can never have too much as far as I’m concerned.

20150204_185914

ALSO:

  • I buy my curry packets at Walmart… and surely if they have the curry at our local small town MO Walmart, they’ll have it at yours!
  • At CoCo’s in Japan, they give you the option of adding vegetables to their curry which is also delicious – everything from potatoes, carrots, mushrooms, onions, green beans, bamboo shoots, Japanese vegetables, and more. I really like the potatoes and onions so occasionally I’ll throw them in, but 99% of the time we just stick to meat & cheese. Feel free to add veggies if you’d like!
  • In Japan, you can also get the curry at a spice level anywhere from 1-10 and it gets PRETTTTY spicy… if you’d like it spicier and can only find the mild curry packet, just add some cayenne to the mix. Even the medium-hot isn’t spicy.
  • Be warned that once you have this curry once, you WILL be addicted. And you WILL want it. Weekly. It’s THAT good. And if you don’t like it.. well………. I’m judging. TOTALLY judging.

A Lot Can Happen In a Month!

One month ago right this second, we were falling in love with Stella for the first time. I can’t believe it was only a month ago! Seems like she’s been with us for a lot longer than that. Maybe because we dreamt of her for so long before she was actually here. :)

We spent another weekend with warm February temperatures [read: 66 degrees] working on Stella. We got all of the bottom wall panels removed, which means we are one step closer to raising the body off the frame. While Casey worked on drilling out the rivets so we could remove the wall panels, I helped by vacuuming up all the gunk & grime we’ve been jonesin’ to get cleaned out. Thank goodness for respirators! And overalls. And gloves.

 20150207_14061220150207_13411020150207_134430

Once we had gotten all of the filth vacuumed and most of the screws picked up, we worked on getting all the insulation out so we could vacuum out the c-channels. The aluminum is so shiny beneath the walls! Now that the floors are all vacuumed up and everything is off the floors in the interior, it is easier to see some of the floor rot we’ve got going on. I only included a couple pictures, but there are 4 or 5 different areas where there are holes in the floor. The worst area, by far, is the rear (picture below right). We’re unsure what the frame looks like, but we are certainly eager to find out. And really, that’s our next big step. Aside from a bunch of rivets to drill out & building the gantries to actually lift the body from the frame, we’re ready to for lift off! Note to self: use as future blog post title.

 20150207_143301 20150207_143245

It is super exciting seeing Stella so empty; it makes it so much easier to dream of the future. She’s just a big blank slate ready for restoration love! And it looks so spacious. The left photo is looking from the front of the Airstream to the back (the living room to the bathroom); the right is the back looking to the front (the bathroom to the living room).

 20150207_154506 20150207_154532

We ended our day of demo drilling out rivets. Shocked? ;) Saturday was especially exciting because we drilled out our first EXTERIOR rivets! To drill out rivets, Casey just takes an ⅛ inch drill bit and drills in the middle of the rivet until it pops. The interior rivets are “easier” in that they have holes in the middle that the drill bit sits inside nicely. The exterior rivets are a bit trickier, so Casey uses a center punch to make an indentation in the center of the buck rivet, which he then uses to center the drill bit on so it doesn’t ding up the aluminum by slipping off the rivet on accident.

 20150207_162543(0) 20150207_162436

20150207_162528 20150207_162425

Thanks to Google Photo, I’ve got this fancy .gif to show you of Casey drilling out some already center-punched buck rivets! I love Google.

20150207_162736-MOTION

Here are some holes where rivets were drilled out, as well as 8 center-punched rivets. These are from the front area of the Airstream where the frame is attached to the body itself via the hold-down plate.

20150207_162641

After drilling out those 20 rivets in the hold-down plate we called it a day. We had a night full of work on a friend’s shop (hey solarpro!) so we thought that was a good place to stop on the Airstream. But not, of course, before taking a picture of my newest impulse Amazon purchase! How cute right!? Can’t wait until this sentiment is a reality. Now to brainstorm job ventures that would allow for months of travel on end…

IMG_20150207_164635

I can’t believe how far we’ve gotten in a month. I’m grateful we are making our dream become a reality. It feels good. Really, really good. Can’t wait to see what the next month holds for us. :)

Gut Job GO!

The restoration has begun!

Stella showed up to the shop (aka her new temporary home) around 9:30 this morning and we were really motivated to get her gutted. It went fairly quickly since it had already been partially done by the previous owners. From left to right in the following pictures: where we started today, in progress, what she looked like when we stopped today, & the last is a pile of things we took to the dumpster.

20150125_09560520150125_114847

20150125_15554520150125_114810

It was dusty, musty, & a wee bit chilly, but we were able to get a large portion of the interior out of the airstream. It’s too bad we couldn’t salvage much; nature really took her toll on much of the inside. We did make sure to save a few pieces to use as templates for the future walls, as well as the screens from the windows and the metal channels for the walls to go into. It was pretty smooth sailing, save a few stripped screws. We had hoped to find some fun treasures hidden away in the nooks & crannies, but really only came away with creepy ones…

20150125_123407

20150125_124120

aaaaaaand by creepy, I clearly mean a mummified mouse & a bag of doll heads buried underneath the couch???! What the heck?! Maybe the original owner was a gypsy lady who made baby dolls so she could be a full-time air streamer? The only exciting discovery we found was an 8-track tape player with an 8-track tape inside titled “AMERICA” because, ‘merica. Not sure how we missed that bad boy on our first 10 walk-thrus!

20150125_110832

Once we’d gutted most everything (except the bathroom; didn’t have the tools we needed to disconnect the plumbing), we got started on removing a sheet of interior paneling which meant removing our first hundred rivets. ;) We enjoyed the de-riveting so much that we promptly went to Lowe’s right after to buy another ten ⅛ inch drill bits for the next time we visit Stella! We were pleased to find that the curb side wheel well looked to be in pretty good shape. The interior wall behind the paneling didn’t look so bad either. We decided to stop after getting that first piece off; better to buy some respirators at Lowe’s as well so we can start removing all the insulation. The first rivets came out fairly easily, but boy are there a lot of them! At least it goes really quickly.

20150125_150507

It’s amazing to see how differently she looks from when we picked her up; just gutting her makes the inside feel totally different! It’s easier to imagine what the interior could look like without all the furniture and chaos inside. I get excited planning the future floor plan, although nothing is set in stone yet. I’m sure it will be ever evolving. All in all, it was a hugely successful day – not only is Stella semi-inside being at the shop, but she’s practically lost 50 pounds of deteriorated furniture weight. Day one down! Only a few hundred more reno days to go. :)

20150125_095133

Meet Stella

While at work on an ordinary Friday afternoon, I got a phone call from Casey around 2:30 pm.

“I think we’re about to buy an Airstream…………”

“Whaaaaaat! Are you serious?!”

Less than 2 hours later we were on the road, headed to southern Missouri. About 10 minutes away from seeing the Airstream for the first time, we saw a shooting star soar across the sky, leading us right to her. It was fate smacking us in the face.

Casey & I have talked about getting an Airstream and going tiny for quite a while. It’s been a dream of ours, but just that: a dream. A dream we thought we’d fulfill one day, but one day in the far future. We’re still undecided on a few things; Casey would love to live in an Airstream full-time right now. I would love to live in an Airstream full-time a little later in life [circa: retirement]. But the both of us want an Airstream regardless for traveling, adventures, and exploring, so many times over we have talked about owning one, oogled at every single Airstream we have ever driven by, and endlessly looked up restoring one online. We have gotten pretty dang good at spotting Airstreams any & everywhere we go, and we knew that one day we would be the proud owners of our very own Dream Stream.

As soon as we saw her, we fell in love. The ad on Craigslist had mentioned that it would be a fixer upper and we knew it would be a lot of work to restore her, but we have wanted an Airstream for so long that it was a no brainer to take her home. Plus the price was so good, it was practically highway robbery. The stars aligned for us and Stella the Dream Stream was born. Getting her home was 97% trouble free – with the exception of that one blown out tire we had within 5 miles of picking her up. Thank goodness for spare tires! But other than that, it was a smooth sailing 5.5 hour drive home, jerry-rigged lights and all.

The inside had already been partially ripped out; the kind couple we bought Stella from had planned to turn her into a food truck but decided against it (lucky for us!). Prior to them buying her in July 2014, she sat for 20+ years in the backyard of the previous owner. Some of the windows have been broken out and she sat exposed to nature for many many years, which adds to the condition that she’s in. It’s going to be a LOT of work to bring her back, but the body of the Airstream is good. Just needs a little buffin’! Hopefully sooner rather than later we can get her into the shop and work on taking the body off the frame to see what kind of condition she’s in but for now, we’re just happy to be owners of an Airstream. Scratch that – we’re THRILLED. She’s a 1967 Airstream Overlander, 26′ Double. Ever since we brought her home 2 weeks ago, we’ve been on the forums, blogs, & Pinterest every night getting ideas, learning as much as we can, and getting ourselves ready for the adventure we have ahead of us!

20150110_135957

20150110_135827

20150110_135624

20150110_135520

Buying this Airstream is the most spontaneous & exciting thing we’ve done to date and we are still in shock at how lucky we got. Here’s to chronicling the restoration of our diamond in the rough. We love her so much, our Stella the Dream Stream.